Build guide · Manual V1.5.1
XP1 build guide
The official MMC XP1 manual as a web page: parts lists, design notes and all 41 assembly steps.
Before you start
- Print every part in the printed parts lists below and get the shopping list ready before you start.
- Each step builds one sub-assembly. Keep them aside until the final assembly, as the notes say.
- The download includes an interactive 3D PDF of the chassis. Open it in Adobe Acrobat Reader to rotate and explode the model while you build.
- Use the PDF if you prefer to build offline: MMC_XP1_Chassis_Manual_V1.5.1.pdf.
You can
- Print and use the parts for private use, in unlimited quantity.
- Share photos of your prints on social networks or websites.
You can't
- Commercial use or public sharing of the 3D model.
- Modifying or adapting the model for public sharing or sale.
- Distributing, selling, donating or exchanging the digital files.
Bill of materials
Printed parts, black 21 lines
| Qty | Part | Description |
|---|---|---|
| 3 | SPCR-3MM | 3mm Spacer |
| 6 | SPCR_2MM | 2mm Spacer |
| 1 | XP1-001 | Lower Deck |
| 1 | XP1-003-1 | Front LCA Left |
| 1 | XP1-003-2 | Front LCA Right |
| 1 | XP1-004 | Upper Deck |
| 2 | XP1-006 | Front UCA Right and Left |
| 2 | XP1-008 | Front Fixed-length Push-rod |
| 1 | XP1-011 | Servo Fixed-length Actuator |
| 1 | XP1-012 | Steering Lower Spacer |
| 1 | XP1-013 | Steering Upper Spacer |
| 2 | XP1-015 | Fixed-length Steering Rods |
| 1 | XP1-016-1 | Rear Bulkhead Right |
| 1 | XP1-016-2 | Rear Bulkhead Left |
| 1 | XP1-018 | Adjustable Motor Support |
| 1 | XP1-034-1 | Rear LCA Right |
| 1 | XP1-034-2 | Rear LCA Left |
| 2 | XP1-038 | Rear Active Toe Fixed-length Arm |
| 2 | XP1-039 | Rear Traction Fixed-length Arm |
| 2 | XP1-040 | Rear Camber Fixed-length Arm |
| 1 | XP1-043 | ESC Support |
Printed parts, colour 28 lines
| Qty | Part | Description |
|---|---|---|
| 4 | RPF1_Wheel | 26mm Wheel (Enkei RPF1 replica) |
| 1 | XP1-002 | Front Subframe |
| 1 | XP1-005 | Front UCA and Caster Adjustability Support |
| 1 | XP1-007 | Front Suspension Rocker Arm |
| 1 | XP1-009 | Steering Lever Arm |
| 1 | XP1-010 | Steering Wiper |
| 1 | XP1-014-1 | Front Knuckle Right |
| 1 | XP1-014-2 | Front Knuckle Left |
| 1 | XP1-017 | Motor Support Spacer |
| 1 | XP1-019 | 38T Belt Conversion for Rhino C-LSD / YD2 Diff |
| 2 | XP1-020 | Diff Spacers |
| 1 | XP1-021 | 14T Belt Pulley |
| 1 | XP1-022 | Main Shaft Cover |
| 1 | XP1-023 | 38T Belt Pulley First Stage |
| 1 | XP1-025 | 20T Belt Pulley |
| 1 | XP1-026 | Secondary Shaft End Cap |
| 1 | XP1-028 | 14T Belt Pulley |
| 1 | XP1-030 | Press-fitted 14T Pinion to 14T Belt Pulley Adapter |
| 1 | XP1-031-1 | Battery Support Right |
| 1 | XP1-031-2 | Battery Support Left |
| 1 | XP1-032 | Rear Subframe |
| 1 | XP1-033-1 | Rear Knuckle Right |
| 1 | XP1-033-2 | Rear Knuckle Left |
| 1 | XP1-035 | Rear Suspension Support |
| 2 | XP1-036 | Front Suspension Spacer |
| 1 | XP1-037 | Rear Magnet Support |
| 1 | XP1-041 | Body post front magnet support |
| 1 | XP1-042 | Flex plate |
Shopping list 38 lines
| Qty | Part | Description |
|---|---|---|
| 1 | 14T_PINION | Standard 14T pinion [48p] |
| 1 | 540_MOTOR | Standard 540 Size Motor |
| 46 | BallJoint_4.8mm | 4.8mm BallJoint (6mm thread), see recommended parts |
| 2 | BallJoint_5,5mm_Nut | 5,5mm BallJoint Nut (Included with Shocks) |
| 1 | Battery | "Shorty" type battery |
| 9 | BB-10X15X4 | Ball Bearing, OD: 15mm, ID: 10mm, WIDTH: 4mm |
| 10 | BB-5X9X3 | Ball Bearing, OD: 9mm, ID: 5mm, WIDTH: 3mm |
| 1 | Differential | Rhino C-LSD Differential / Yokomo Standard Differential / RDX Spool |
| 1 | HTD3MBELT_50T (diff) | 50T HTD3M belt (3 or 4 mm) |
| 1 | HTD3MBELT_50T (red.) | 50T HTD3M belt (3 or 4 mm) |
| 1 | HTD3MBELT_54T (motor) | 54T HTD3M belt (3 or 4 mm) |
| 3 | ISO10642 M3x10 | CounterSunk ISO10642 M3x10 Screw |
| 1 | ISO10642 M3X6 | ISO10642 M3X6 Countersunk screw |
| 23 | ISO10642 M3x8 | CounterSunk ISO10642 M3x8 Screw |
| 4 | ISO10642 M4x10 | ISO10642 M4x10 Countersunk screw |
| 2 | ISO4026-M3x10 | M3x10 hexagon socket set screw ISO4026 |
| 4 | ISO7380 M3x20 | ButtonHead ISO7380 M3x20 Screw |
| 10 | ISO7380 M3x10 | ButtonHead ISO7380 M3x10 Screw |
| 8 | ISO7380 M3x12 | ButtonHead ISO7380 M3x12 Screw |
| 13 | ISO7380 M3x6 | ButtonHead ISO7380 M3x6 Screw |
| 6 | ISO7380 M3x8 | ButtonHead M3x8 screw |
| 1 | LHN-45 | Long Hex Nut M4 (45mm) |
| 1 | LHN-60 | Long Hex Nut M4 (60mm) |
| 6 | RN-10 | Round Nut M3 (10mm) |
| 4 | RN-15 | Round Nut M3 (15mm) |
| 4 | RN-20 | Round Nut M3 (20mm) |
| 2 | RN-30 | Round Nut M3 (30mm) |
| 5 | RN-35 | Round Nut M3 (35mm) |
| 1 | Servo | Low Profile type Servo |
| 1 | ServoHorn | Standard Servo Horn (Metal) |
| 3 | Shock_Bottom | Shock Absorbers (Bottom Part) |
| 3 | Shock_Top | Shock Absorber (Top Part) |
| 20 | TI-4 | Brass Threaded Insert (M3x4x4,5) |
| 65 | TI-6 | Brass Threaded Insert (M3x6x4,5) |
| 4 | WHEEL_HEX | Wheel Hexagon |
| 2 | YOKOMO_47MMAXLE_1 | 47mm Yokomo Rear Axle |
| 2 | YOKOMO_47MMAXLE_2 | Yokomo 47mm Rear Axle |
| 2 | YOKOMO_FRONTAXLE | Yokomo Simple Front Axle |
Turnbuckle lengths depend on the balljoints you use. Check the standard arm lengths as reference.
Recommended parts
Parts listed in the manual. Links go to third-party shops.
Design notes
Control arm lengths
The chassis comes with printable control arms. All of them can be swapped for conventional turnbuckles, to reduce costs and give you a good starting point for the alignment.
Rear suspension
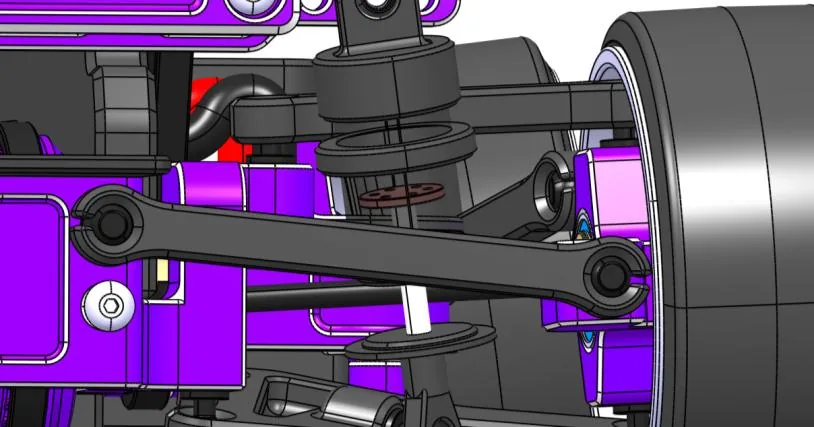
The rear is a multi-link suspension, one of the most efficient systems out there. Its main advantage is the almost unlimited adjustment once the fixed-length rods are swapped for turnbuckles, although the standard alignment already gives a lot of grip.
Front suspension
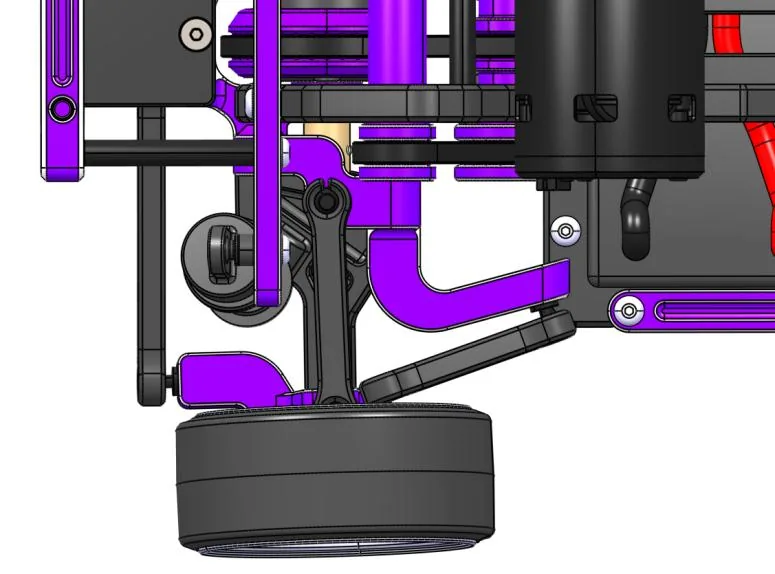
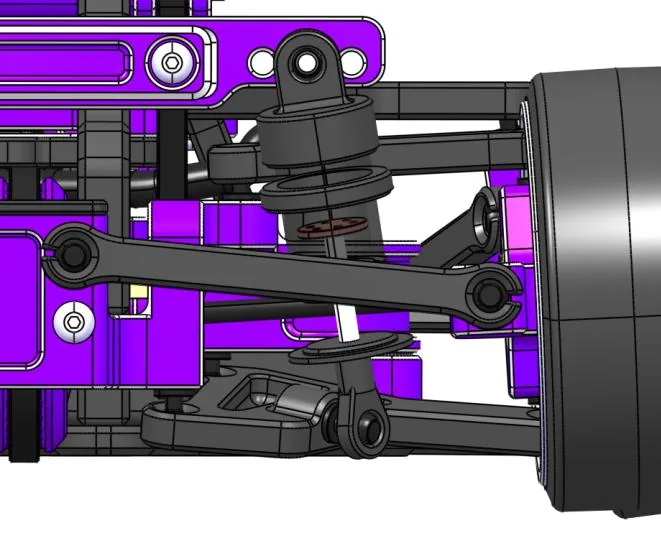
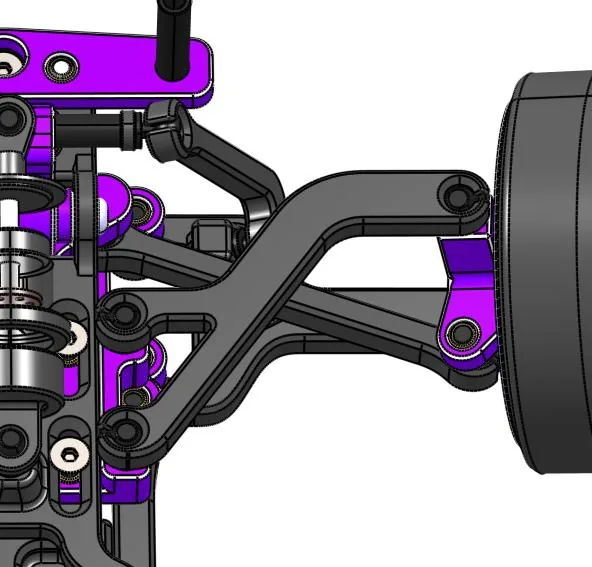
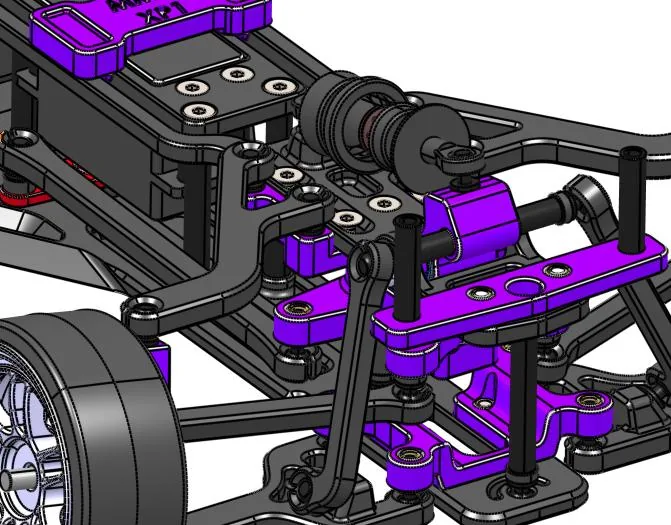
The front is a standard double wishbone setup. The standard version has no camber or track width adjustment; optional parts are on the way.
Its main feature is the mono-shock design. It stiffens the roll of the front of the chassis, acting as a sway bar, which translates into more front grip. The more roll the rear allows, the greater the front grip.
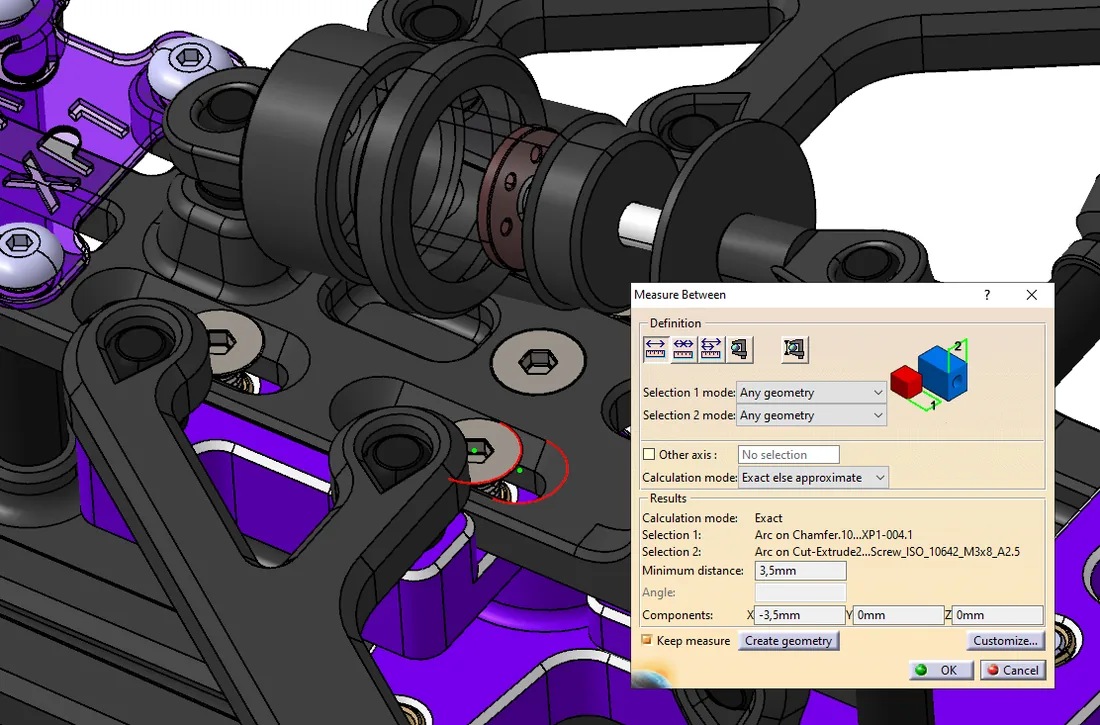
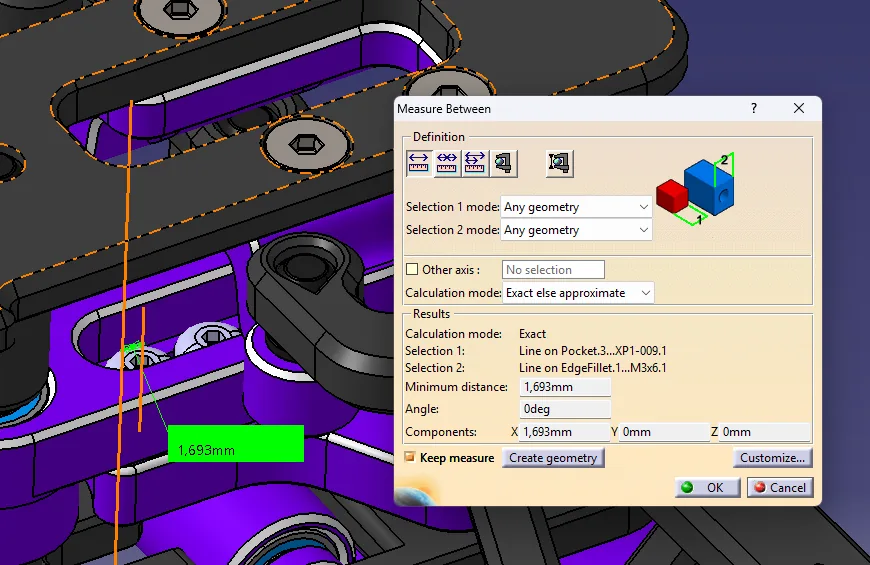
Caster and Ackerman
Reference configuration for caster, and reference position for Ackerman: about 1.5 to 2 mm from the maximum.
Assembly
-
Step 1: Front subframe
XP1-002· 17 parts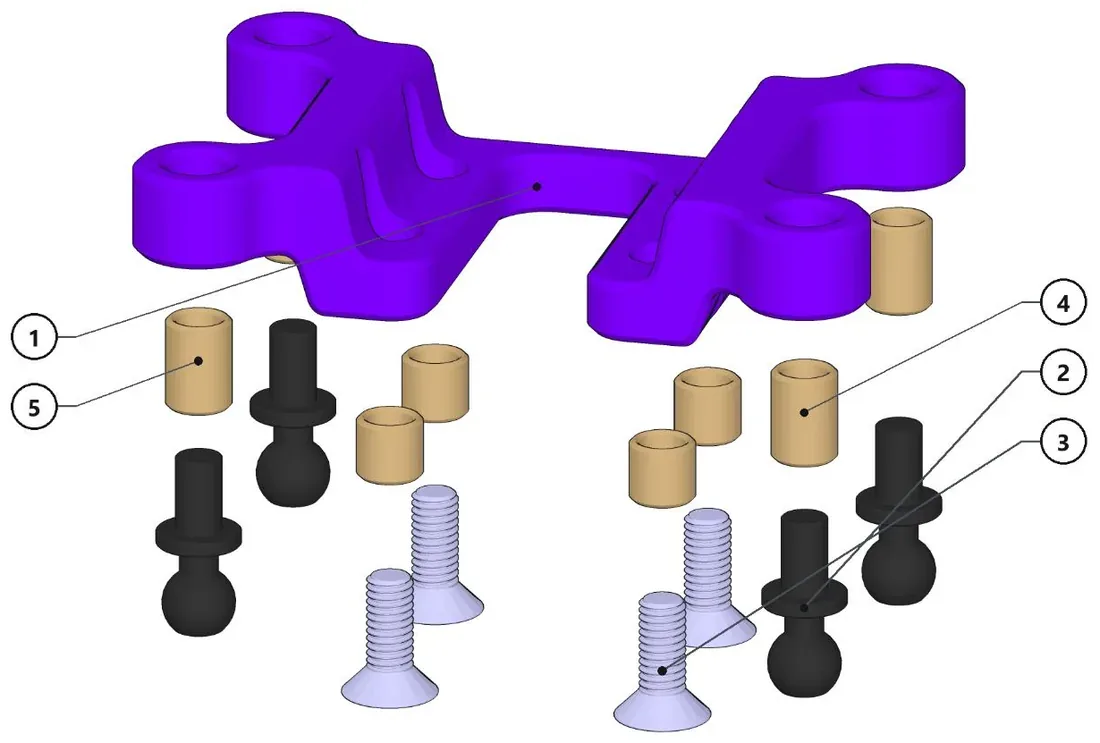
- Install the threaded inserts and the ballstuds.
- Leave the screws attached for final assembly.
Parts · numbers match the drawing
XP1-002×1Front SubframeBallJoint_4.8mm×44.8mm BallJoint (6mm thread)Screw_ISO_10642_M3x8_A2×4TI-6×3Brass Threaded Insert (M3x6x4,5)TI-4×5Brass Threaded Insert (M3x4x4,5)
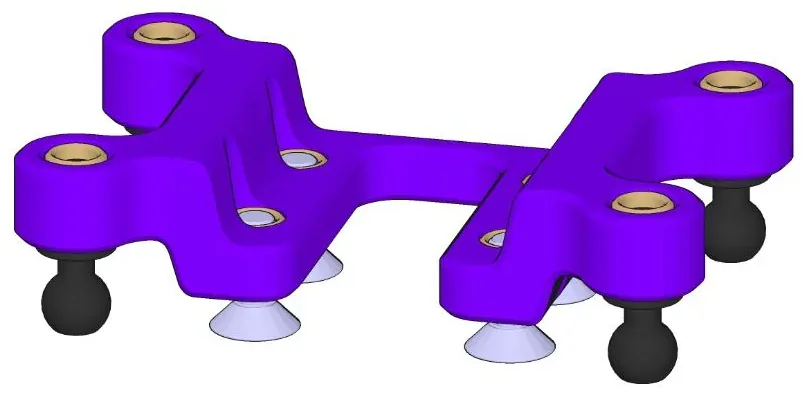
Assembled -
Step 2: Sub-assembly XP1-101
3 parts
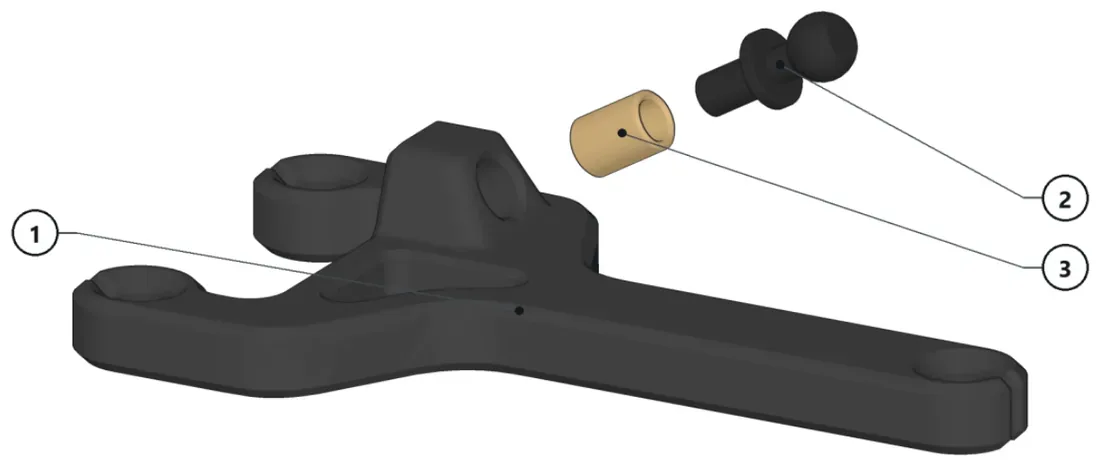
- Install threaded insert and ballstud.
Parts · numbers match the drawing
XP1-003×1BallJoint_4.8mm×14.8mm BallJoint (6mm thread)TI-6×1Brass Threaded Insert (M3x6x4,5)
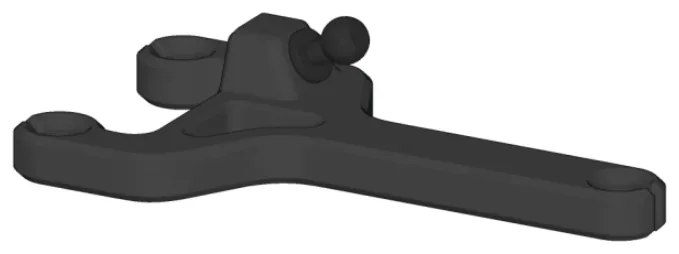
Assembled -
Step 3: Sub-assembly XP1-101-2
3 parts
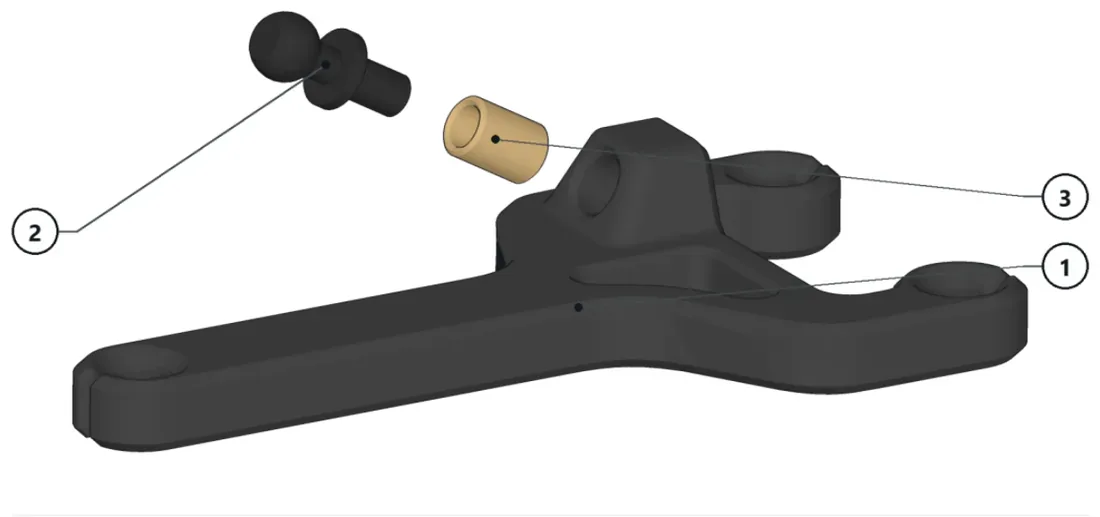
- Install threaded insert and ballstud.
Parts · numbers match the drawing
XP1-003-2×1Front LCA RightBallJoint_4.8mm×14.8mm BallJoint (6mm thread)TI-6×1Brass Threaded Insert (M3x6x4,5)
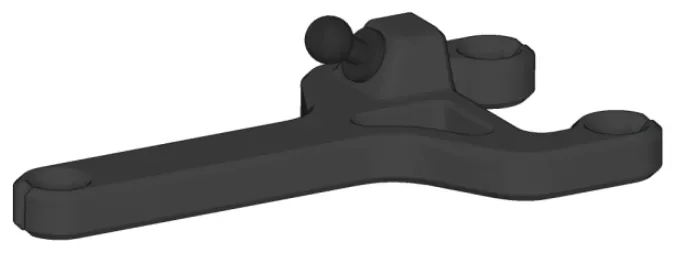
Assembled -
Step 4: Sub-assembly XP1-103
17 parts
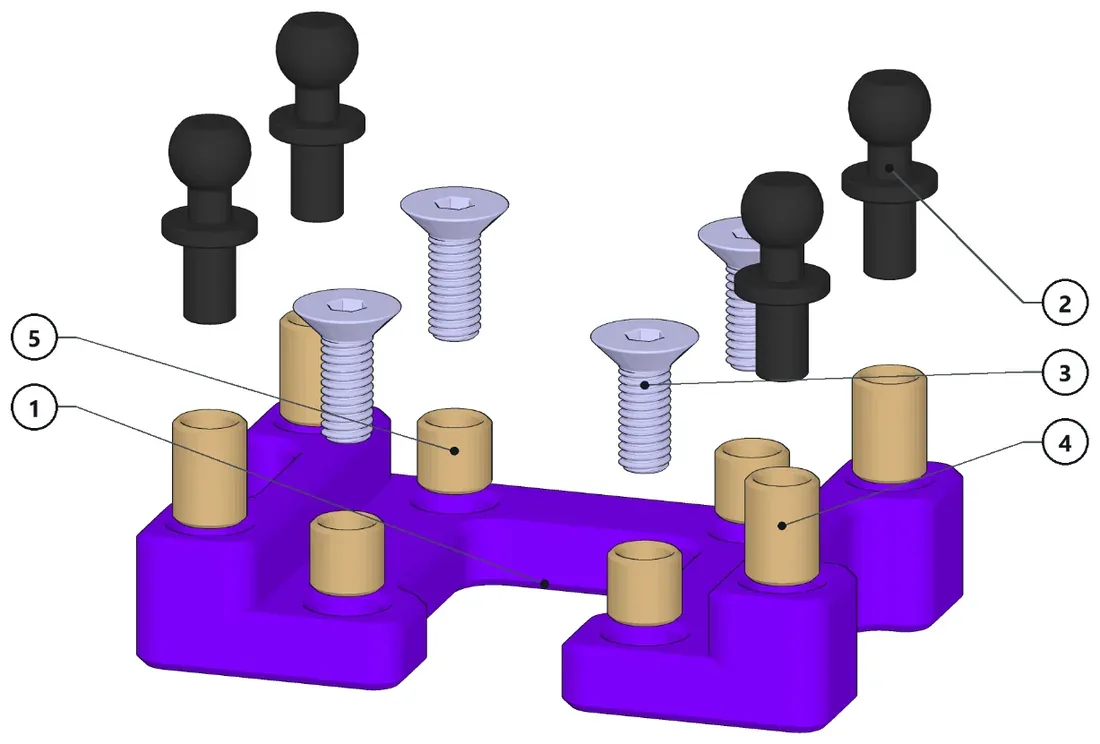
- Install the threaded inserts and the ballstuds.
- Leave the screws attached for final assembly.
Parts · numbers match the drawing
XP1-005×1Front UCA and Caster Adjustability Su…BallJoint_4.8mm×44.8mm BallJoint (6mm thread)Screw_ISO_10642_M3x8_A2×4TI-6×4Brass Threaded Insert (M3x6x4,5)TI-4×4Brass Threaded Insert (M3x4x4,5)
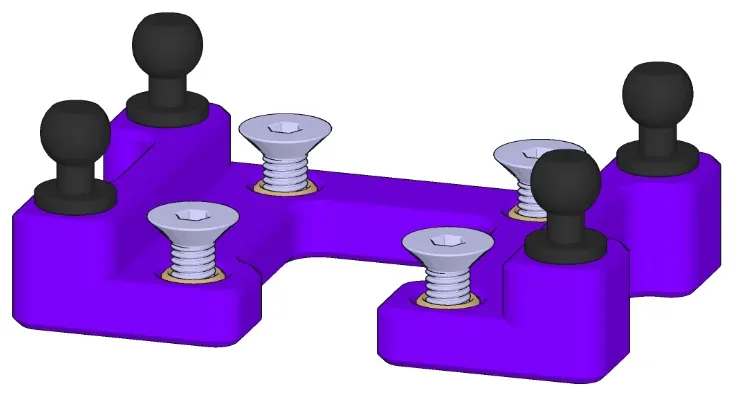
Assembled -
Step 5: Sub-assembly XP1-104
15 parts
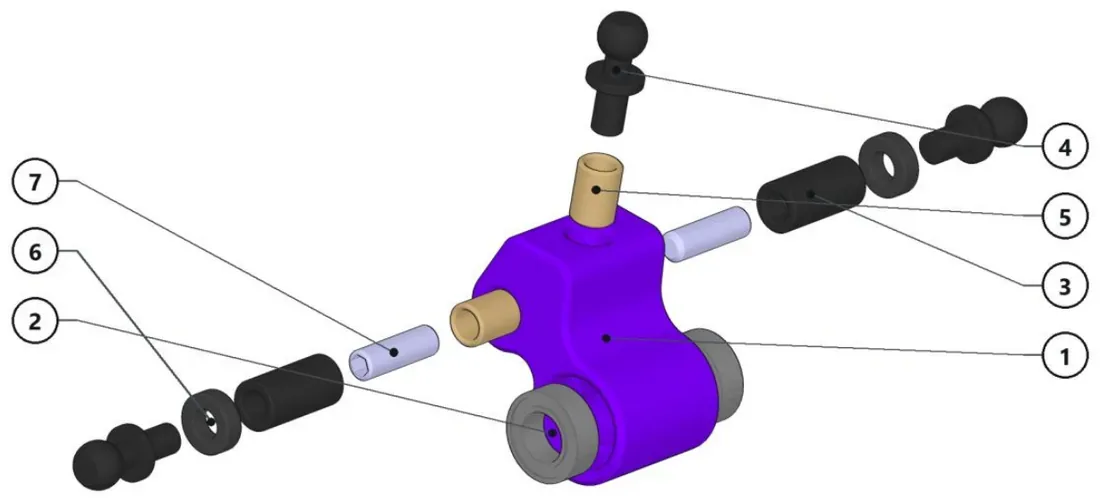
- Install the threaded inserts.
- Screw in the worm screw and round nuts.
- Finally, install the ballstuds and bearings.
Parts · numbers match the drawing
XP1-007×1Front Suspension Rocker ArmBB-5SX9X4×2FR-10×2BallJoint_4.8mm×34.8mm BallJoint (6mm thread)TI-6×3Brass Threaded Insert (M3x6x4,5)SPCR_2MM×22mm Spacer1S04026-M3x10×2M3x10 hexagon socket set scre.
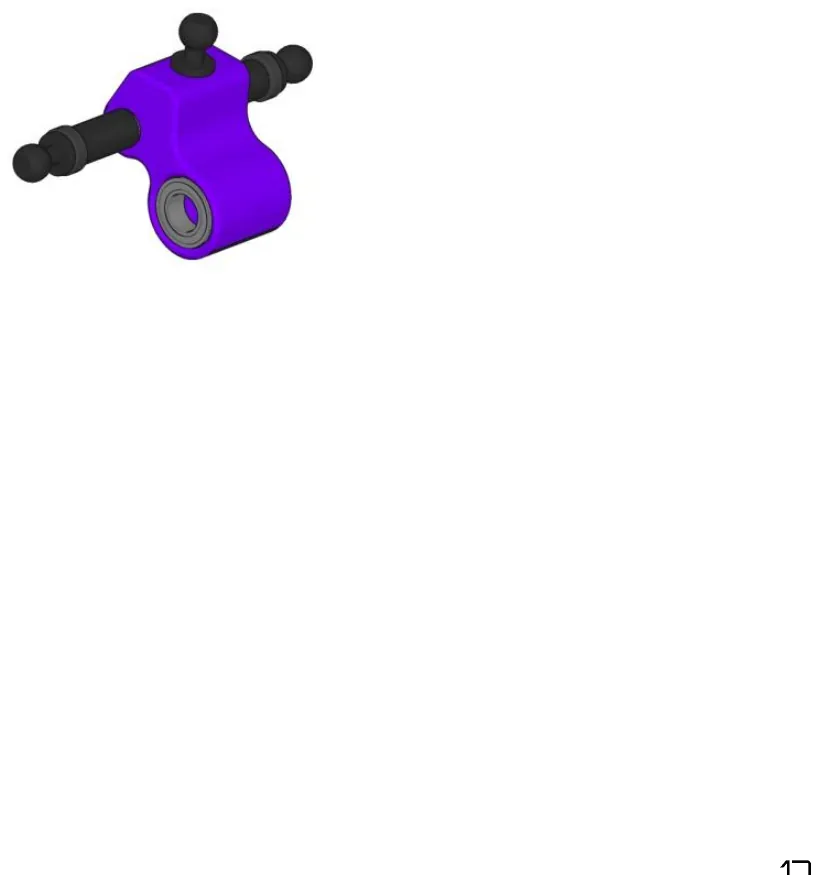
Assembled -
Step 6: Sub-assembly XP1-106-1
12 parts
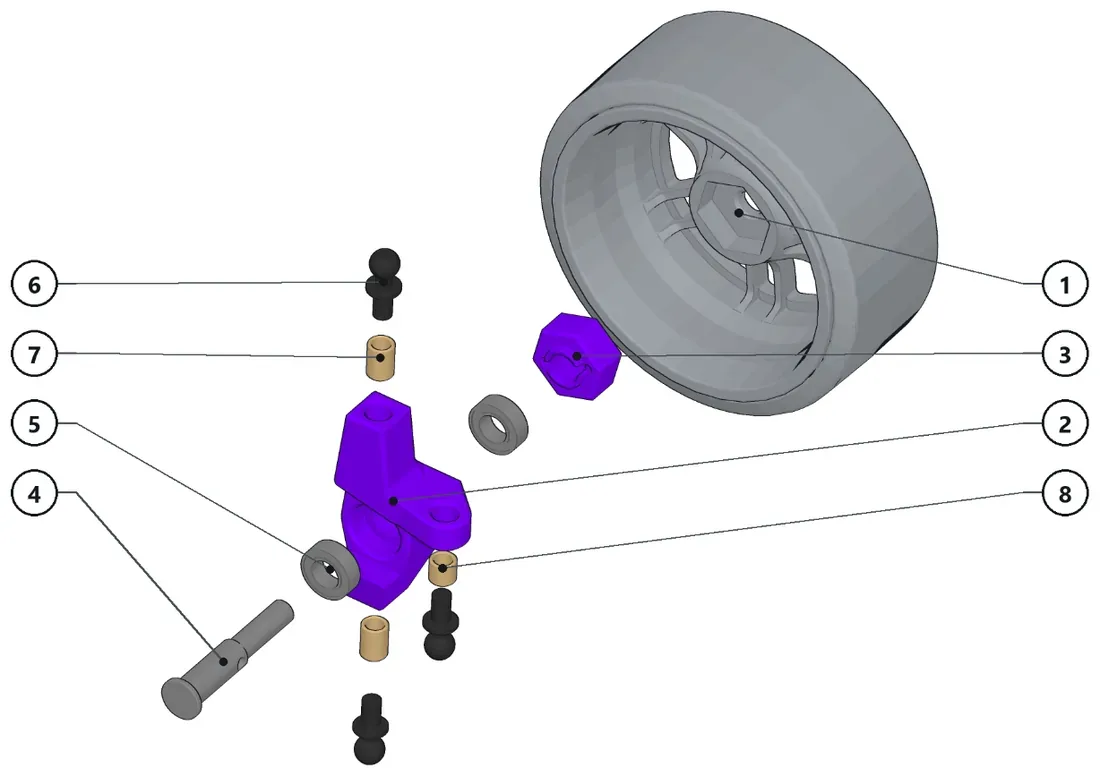
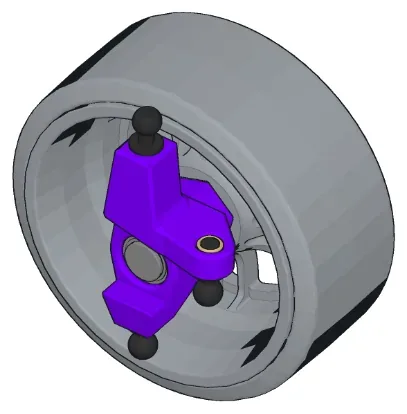
- Install the threaded inserts and the ballstuds.
- Install the bearings.
- Optionally install now the Yokomo axle and the wheel.
Parts · numbers match the drawing
RPF1_Wheel×126mm Wheel (Enkei RPF1 replica)XP1-014-1×1Front Knuckle RightWHEEL_HEX×1Wheel HexagonYokomo_FrontAxle×1BB-5X9X4×2BallJoint_4.8mm×34.8mm BallJoint (6mm thread)TI-6×2Brass Threaded Insert (M3x6x4,5)TI-4×1Brass Threaded Insert (M3x4x4,5)
Assembled -
Step 7: Sub-assembly XP1-106-2
12 parts
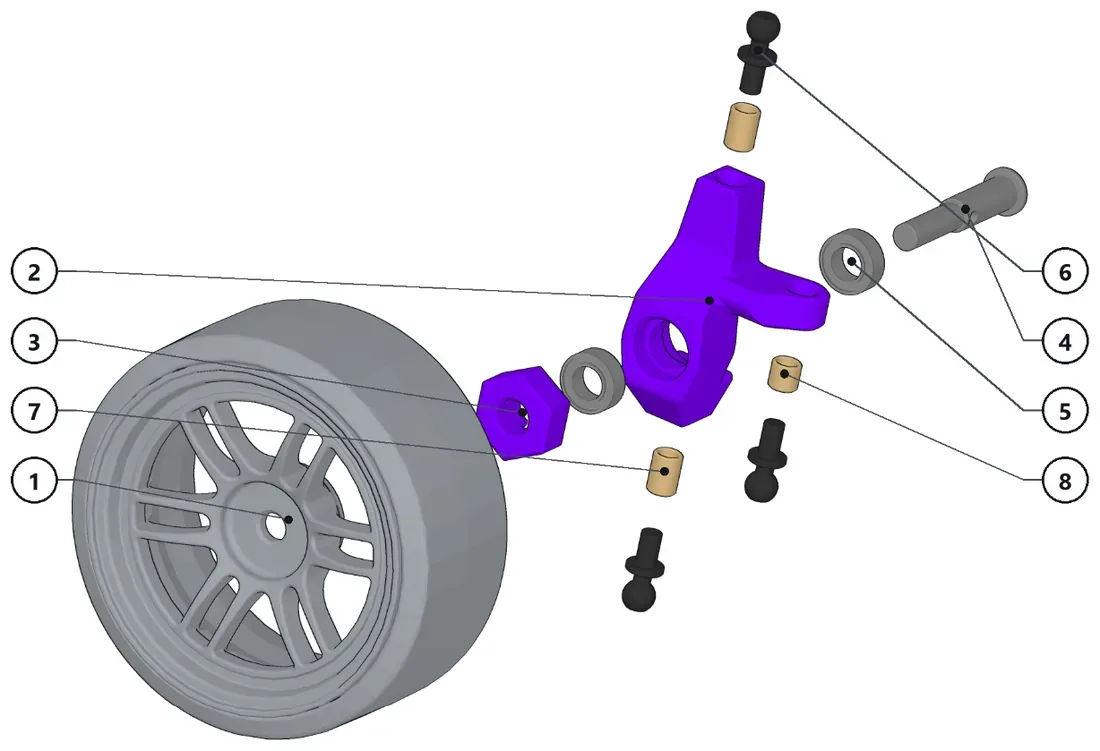
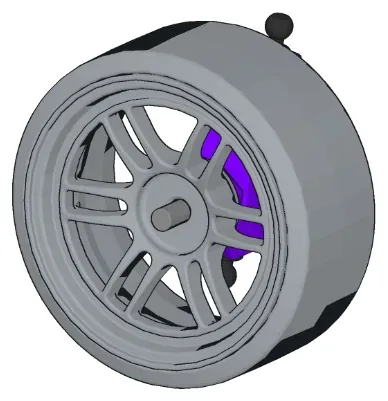
- Install the threaded inserts and the ballstuds.
- Install the bearings.
- Optionally install now the Yokomo axle and the wheel.
Parts · numbers match the drawing
RPF1_Wheel×126mm Wheel (Enkei RPF1 replica)Q) XP1-014-2×1Front Knuckle LeftWHEEL_HEX×1Wheel HexagonYokomo_FrontAxle×1BB-5X9X4×2BallJoint_4.8mm×34.8mm BallJoint (6mm thread)TI-6×2Brass Threaded Insert (M3x6x4,5)TI-4×1Brass Threaded Insert (M3x4x4,5)
Assembled -
Step 8: Sub-assembly XP1-113-1
13 parts
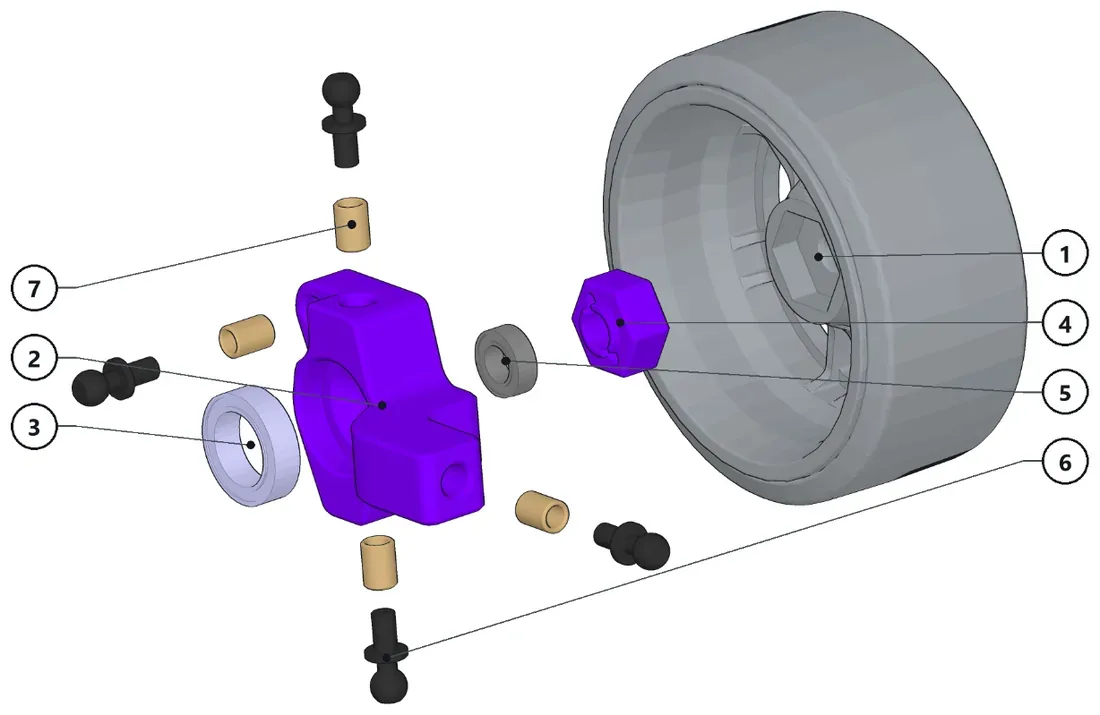
- Install the threaded inserts and the ballstuds.
- Install the bearings.
- Optionally install now the Yokomo axle and the wheel.
Parts · numbers match the drawing
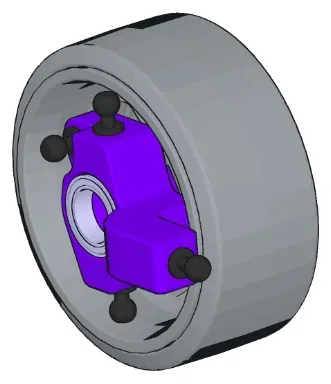
a ) RPF1_Wheel×126mm Wheel (Enkei RPF1 replica)XP1-033-1×1Rear Knuckle RightBB-10x15x5×1WHEEL_HEX×1Wheel HexagonBB-5X9X3×1Ball Bearing - OD: 9mm, ID: 5mm, WI…BallJoint_4.8mm×44.8mm BallJoint (6mm thread)TI-6×4Brass Threaded Insert (M3x6x4,5)
Assembled -
Step 9: Sub-assembly XP1-113-2
13 parts
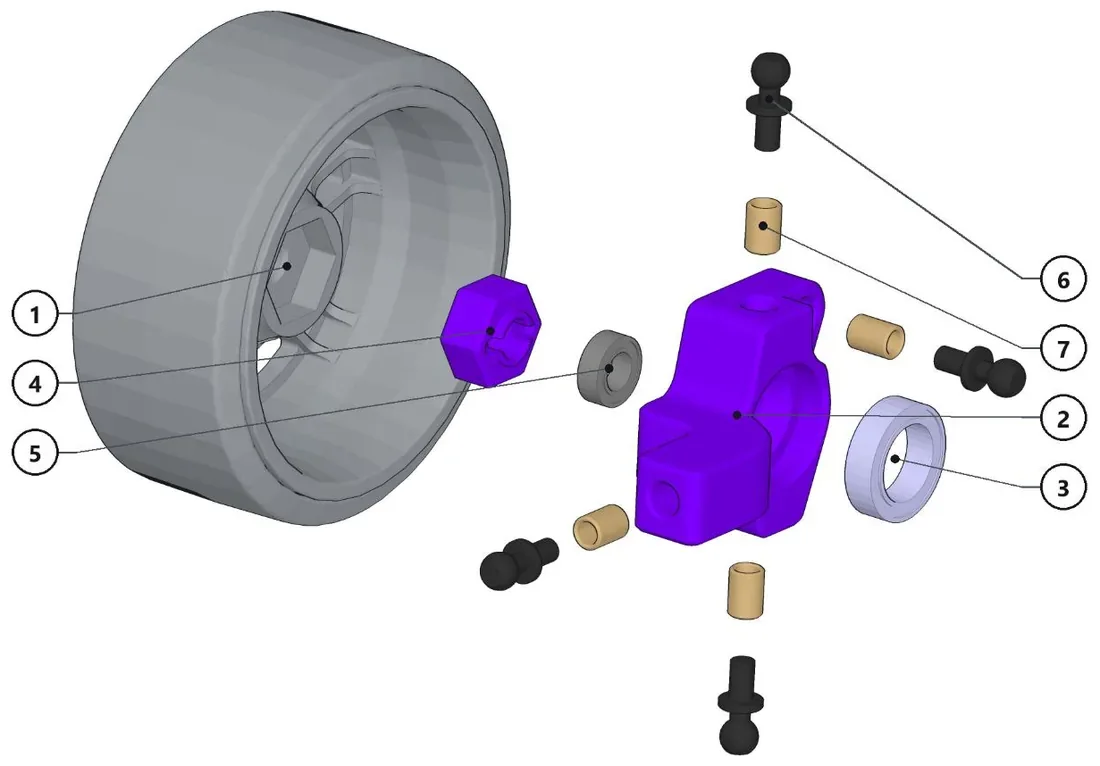
- Install the threaded inserts and the ballstuds.
- Install the bearings.
- Optionally install now the Yokomo axle and the wheel.
Parts · numbers match the drawing
RPF1_Wheel×126mm Wheel (Enkei RPF1 replica)XP1-033-2×1Rear Knuckle LeftWHEEL_HEX×1Wheel HexagonBB-10X15X5×1BB-5X9X3×1Ball Bearing - OD: 9mm, ID: 5mm, WI…BallJoint_4.8mm×44.8mm BallJoint (6mm thread)TI-6×4Brass Threaded Insert (M3x6x4,5)
-
Step 10: Sub-assembly XP1-114-1
3 parts
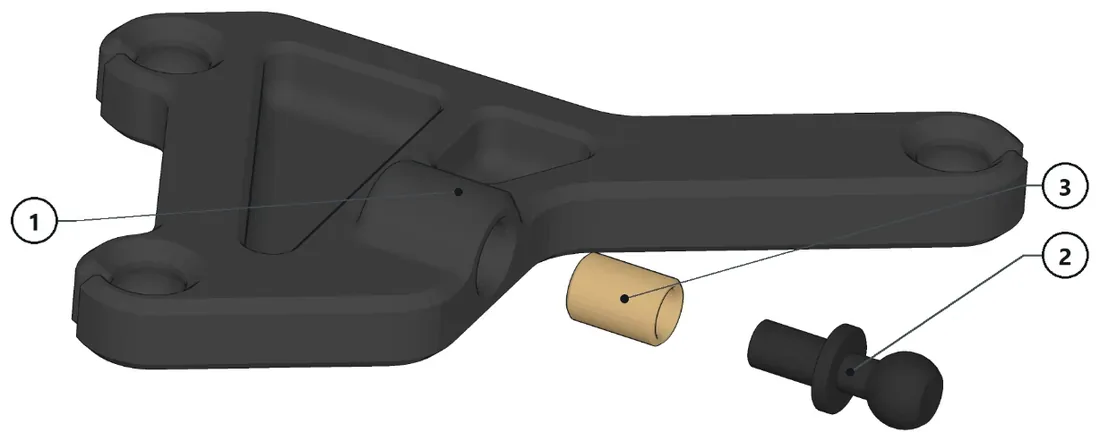
- Install threaded insert and ballstud.
Parts · numbers match the drawing
XP1-034-1×1Rear LCA RightBallJoint_4.8mm×14.8mm BallJoint (6mm thread)TI-6×1Brass Threaded Insert (M3x6x4,5)
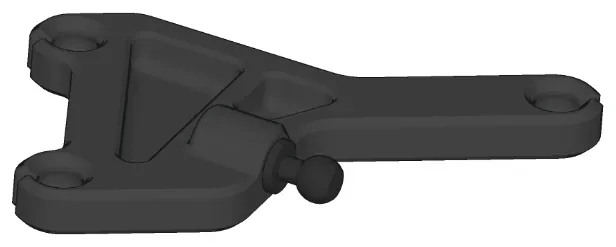
Assembled -
Step 11: Sub-assembly XP1-114-2
3 parts
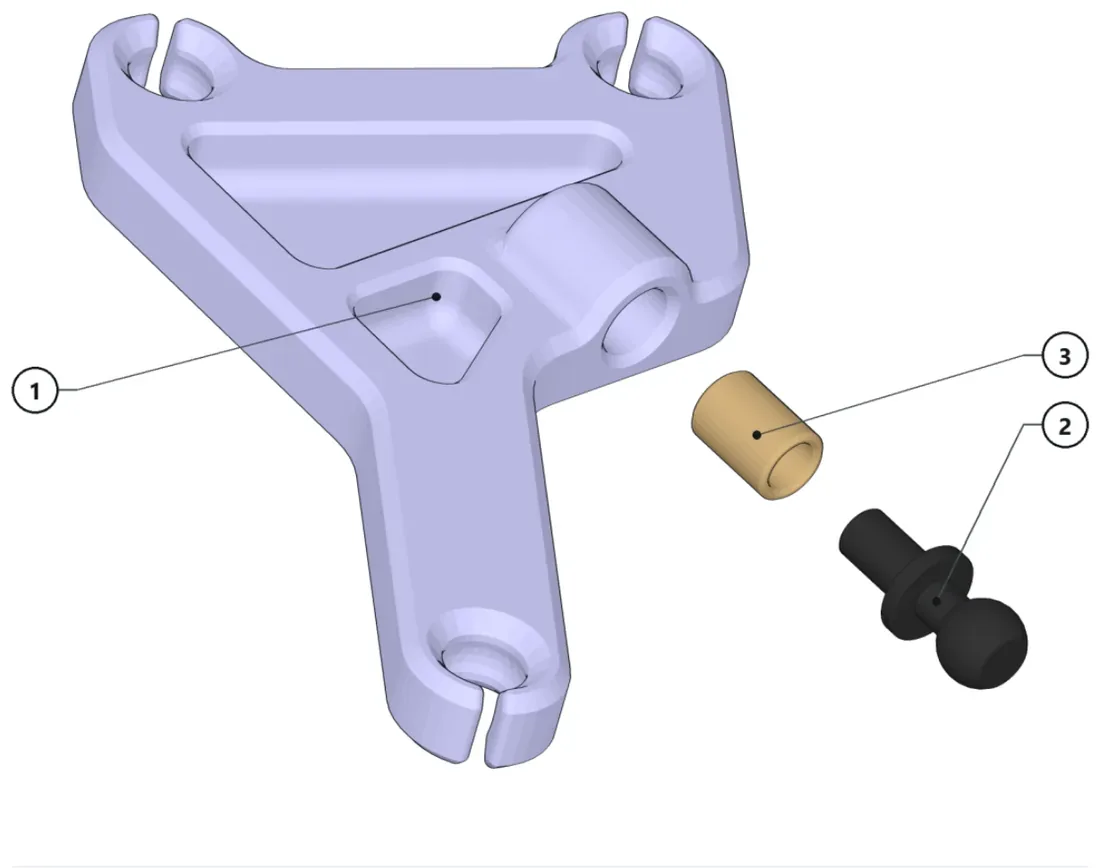
- Install threaded insert and ballstud.
Parts · numbers match the drawing
XP1-034-2×1Rear LCA LeftBallJoint_4.8mm×14.8mm BallJoint (6mm thread)TI-6×1Brass Threaded Insert (M3x6x4,5)
-
Step 12: Sub-assembly XP1-111-1
3 parts
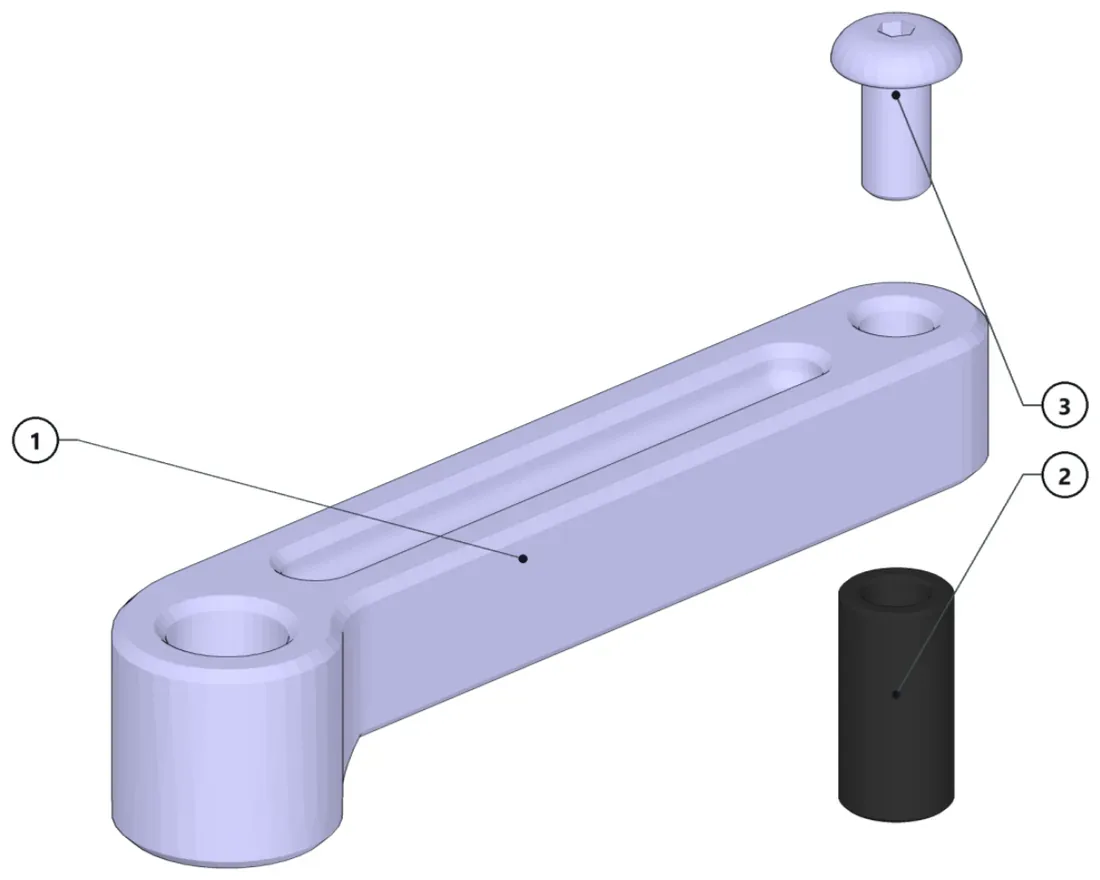
- Install the round nut with the screw.
Parts · numbers match the drawing
XP1-031-1×1Battery Support RightFR-10×1M3x6×1
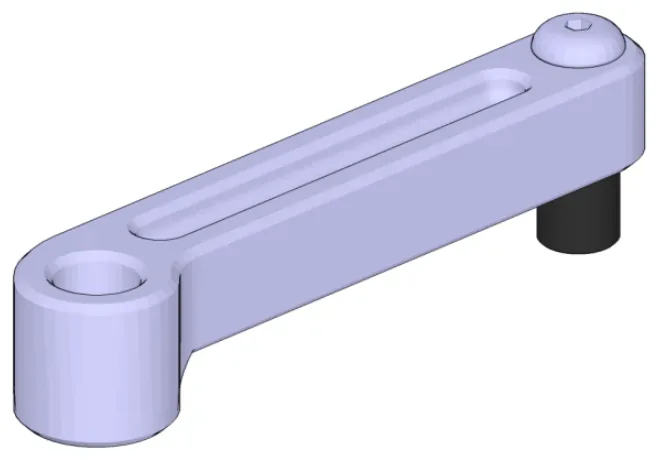
Assembled -
Step 13: Sub-assembly XP1-111-2
3 parts
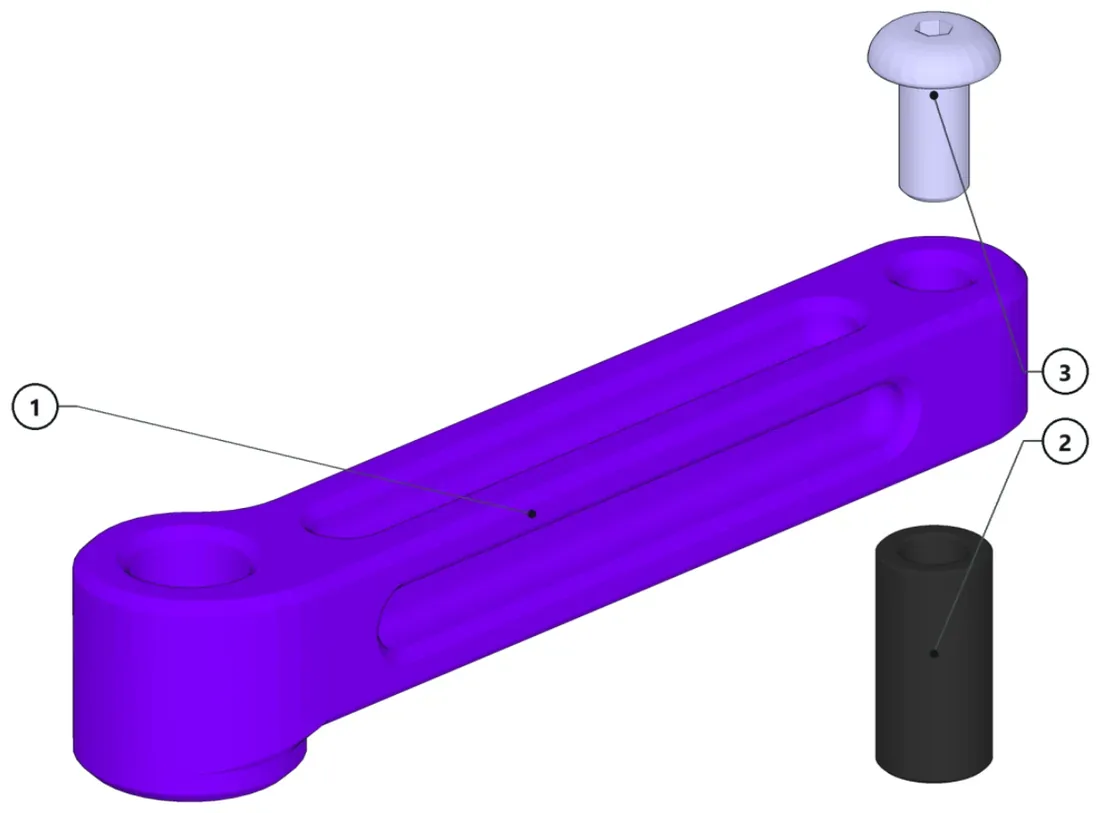
- Install the round nut with the screw.
Parts · numbers match the drawing
XP1-031-2×1Battery Support LeftFR-10×1M3x6×1
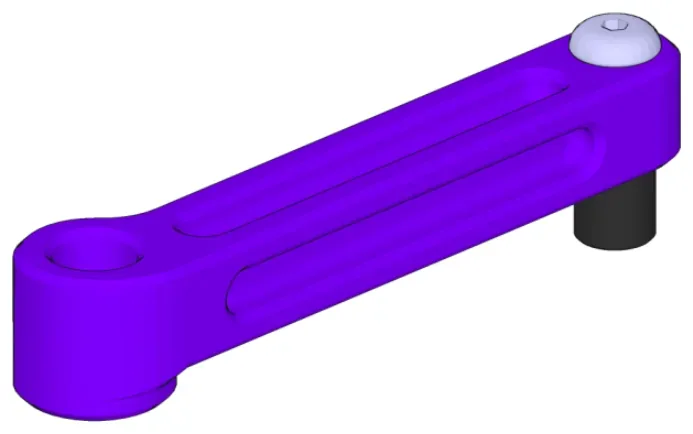
Assembled -
Step 14: Sub-assembly XP1-116
5 parts
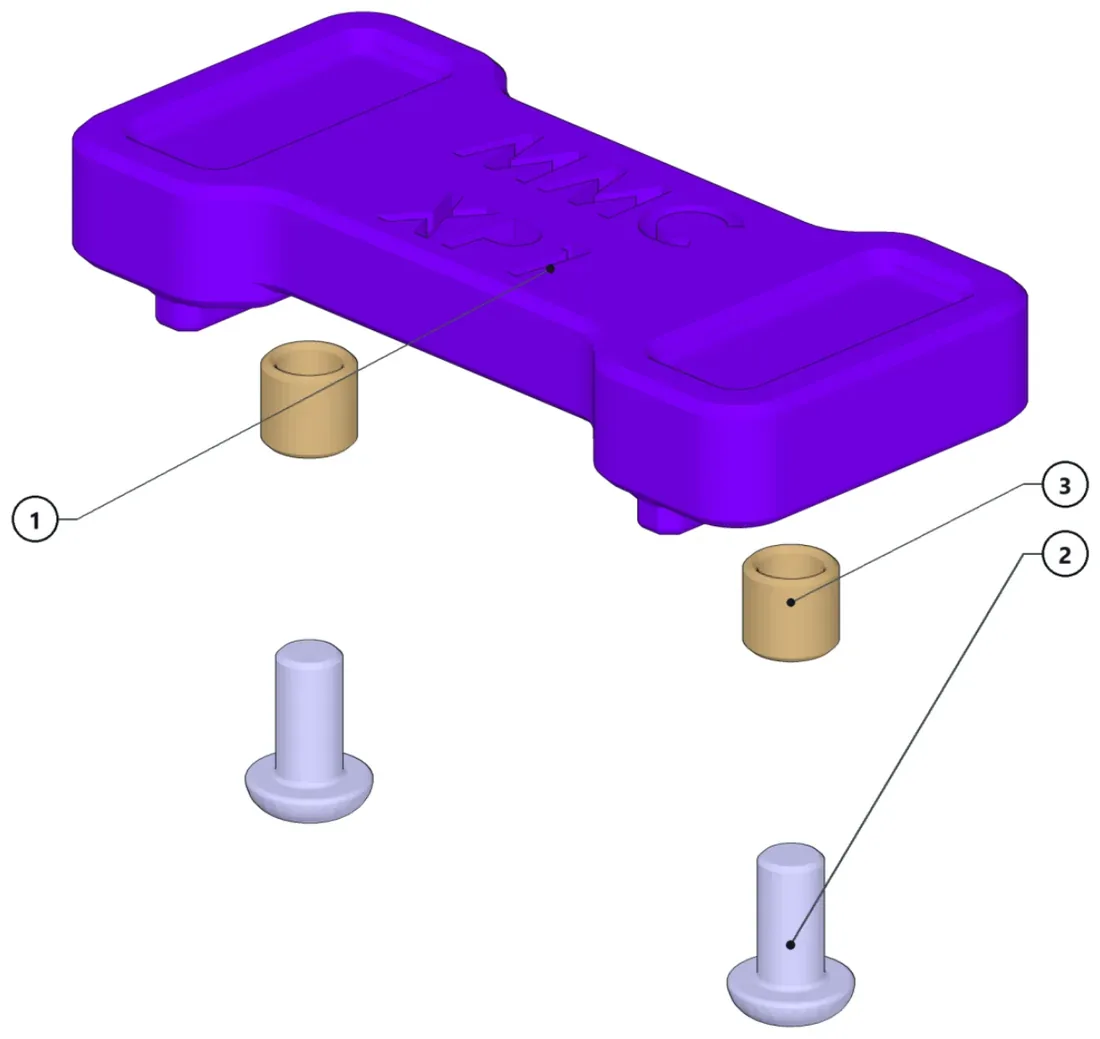
- Install the threaded inserts.
- Leave the screws attached for final assembly.
Parts · numbers match the drawing
XP1-042×1Flex plateISO7380 M3x6×2ButtonHead ISO7380 M3x6 ScrewTI-4×2Brass Threaded Insert (M3x4x4,5)
-
Step 15: Sub-assembly XP1-1000
9 parts
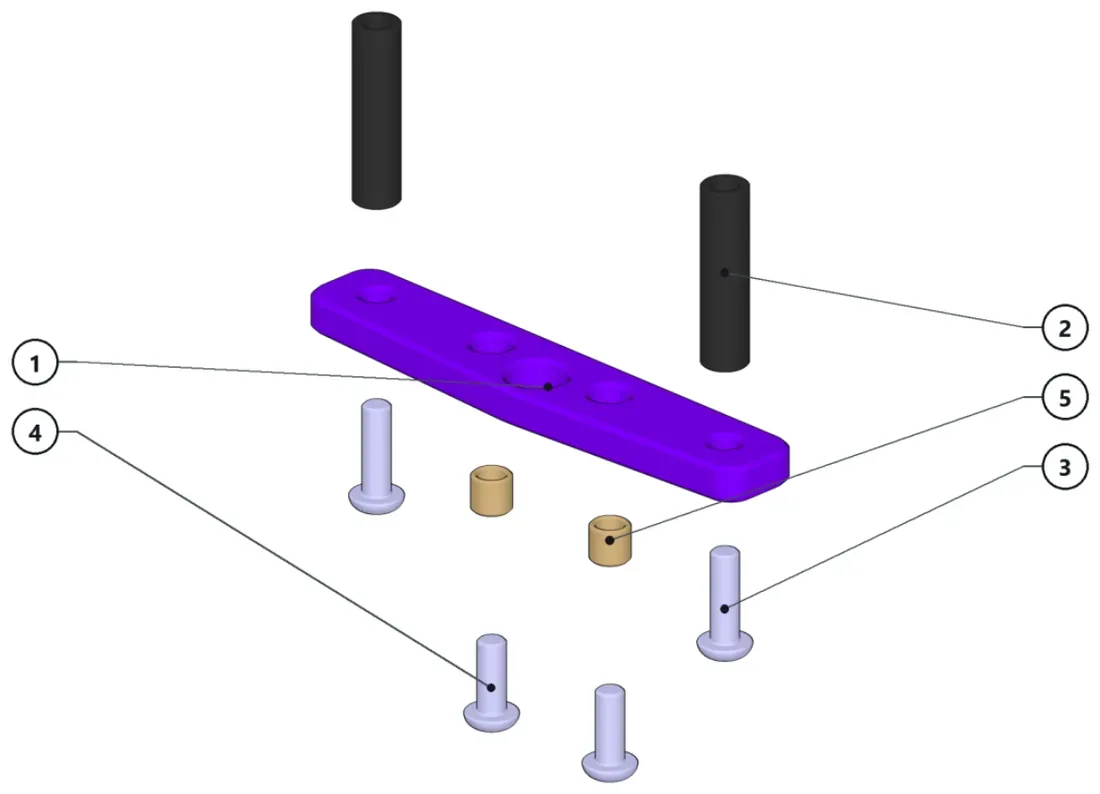
- Install the threaded inserts.
- Screw in the round nuts with the screws from the bottom.
- Leave the countersunk screws attached for final assembly.
Parts · numbers match the drawing
XP1-041×1Body post front magnet supportRN-20×2Round Nut M3 (20mm)ISO7380 M3x10×2ButtonHead ISO7380 M3x10 Sc…M3x8×2TI-4×2Brass Threaded Insert (M3x4x4,5)
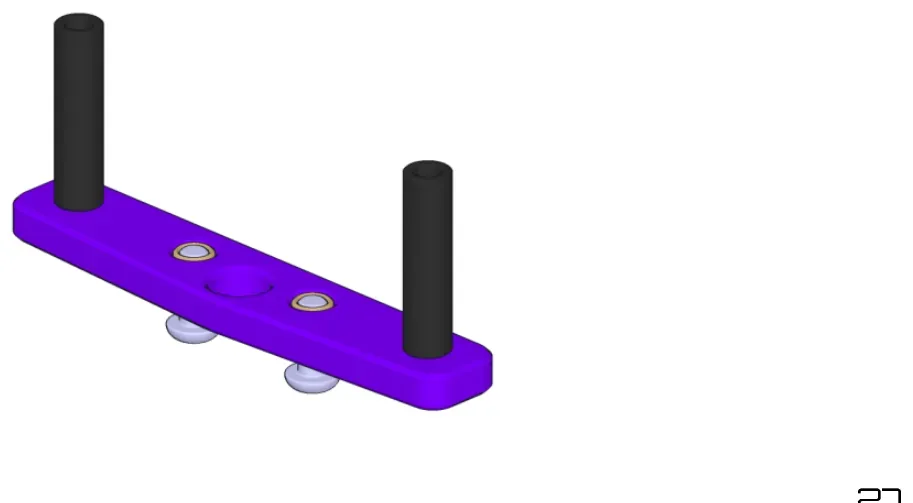
Assembled -
Step 16: Sub-assembly XP1-1002
3 parts
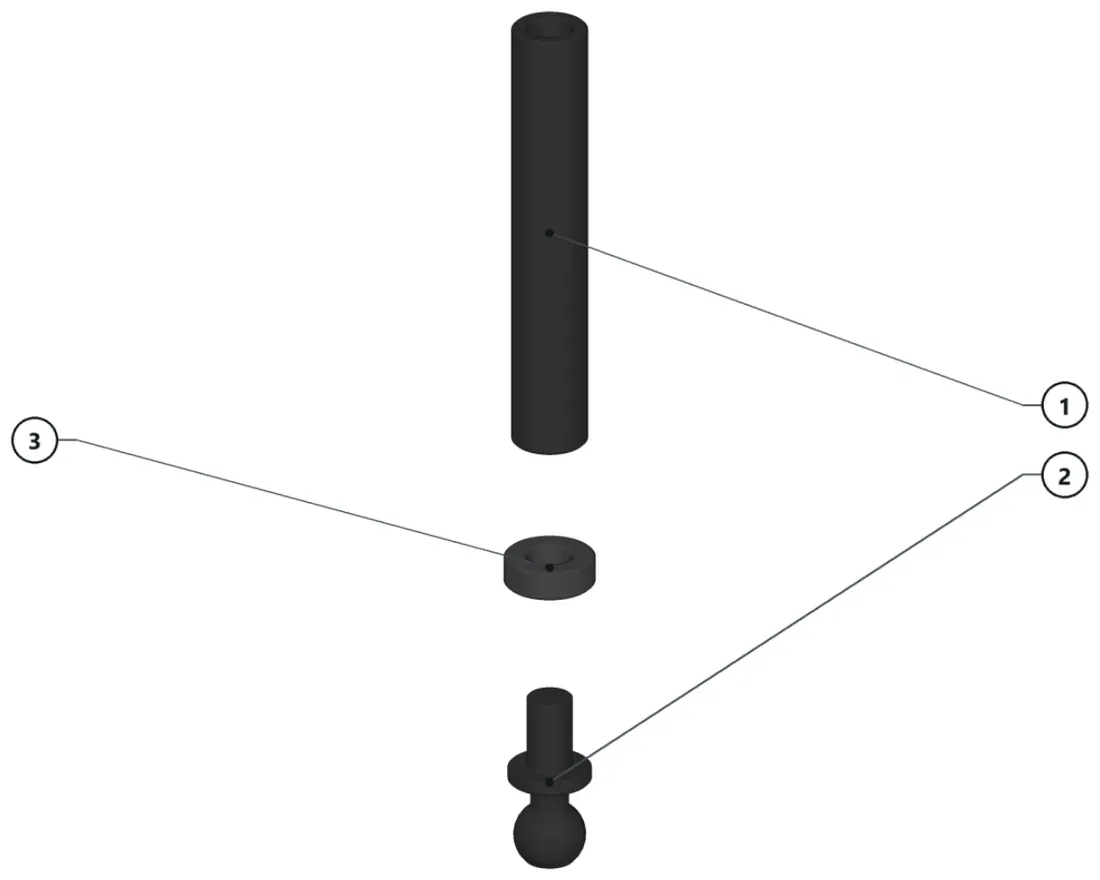
- Screw in the ballstud with the 2mm spacer.
Parts · numbers match the drawing
FR-35×1BallJoint_4.8mm×14.8mm BallJoint (6mm thread)SPCR_2MM×12mm Spacer
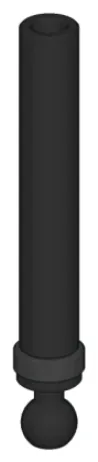
Assembled -
Step 17: Sub-assembly XP1-1001
5 parts
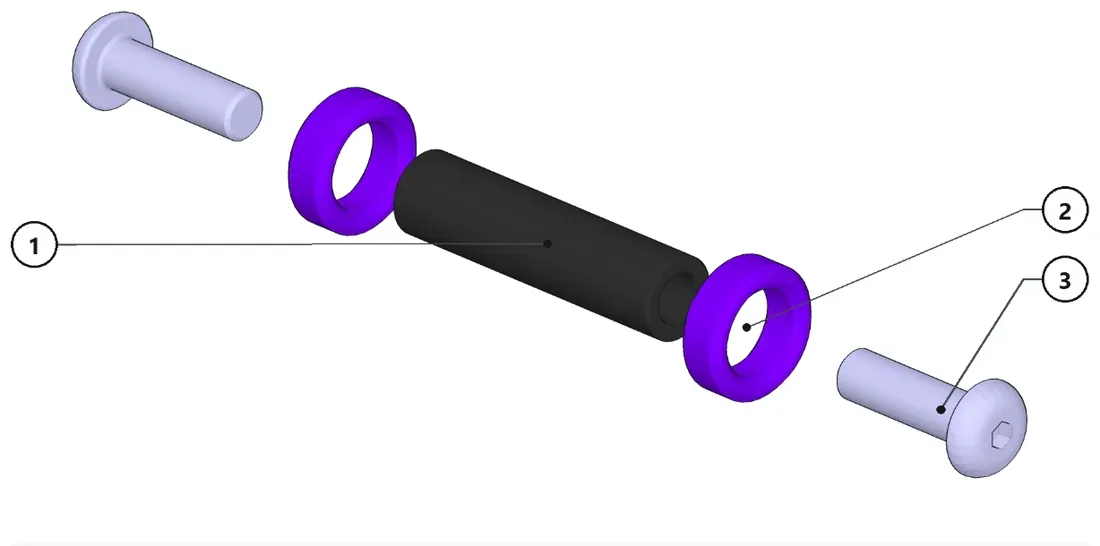
- You can make this assembly to the upper deck directly.
Parts · numbers match the drawing
RN-20×1Round Nut M3 (20mm)xp1-036×2M3x10×2
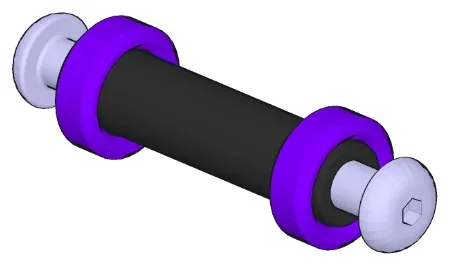
Assembled -
Step 18: Sub-assembly XP1-1030
11 parts
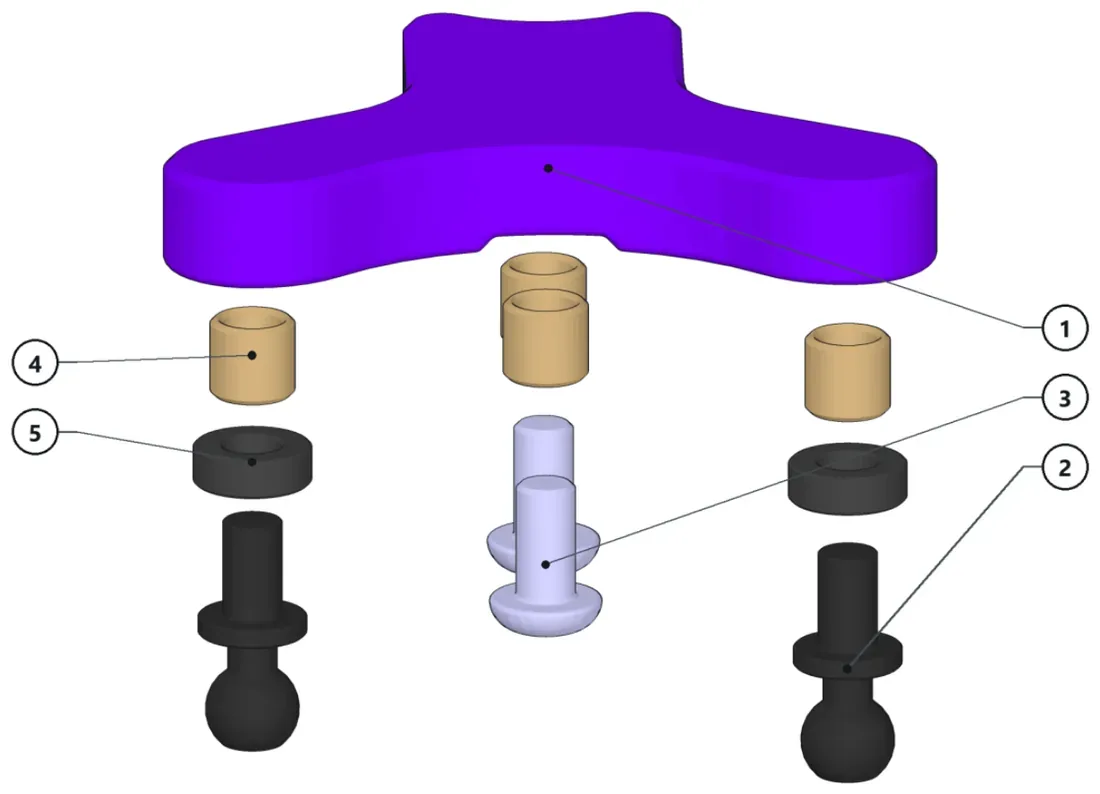
- Install the threaded inserts and the ballstuds.
- Leave the screws attached for final assembly.
Parts · numbers match the drawing
XP1-010×1Steering WhiperBallJoint_4.8mm×24.8mm BallJoint (6mm thread)M3x6×2TI-4×4Brass Threaded Insert (M3x4x4,5)SPCR_2ZMM×22mm Spacer
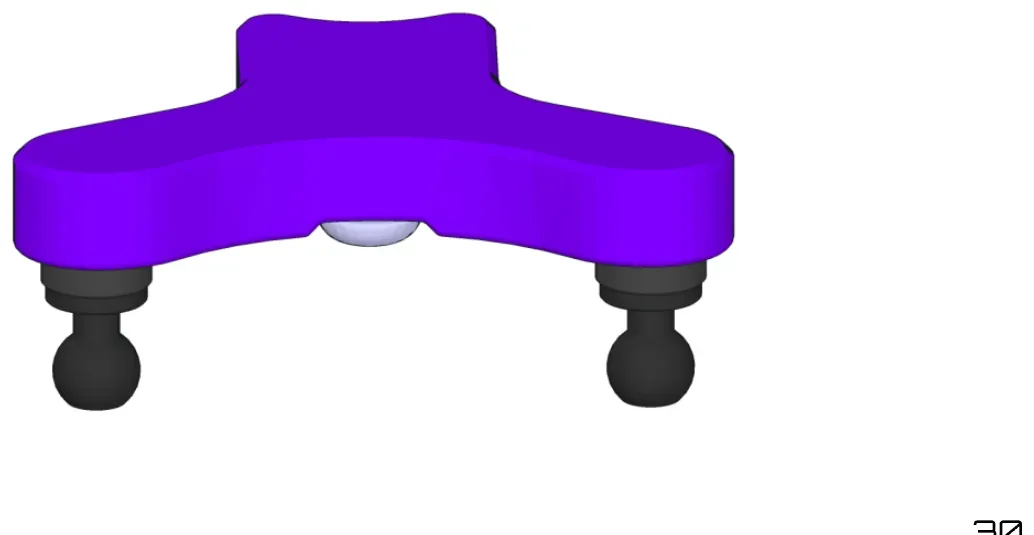
Assembled -
Step 19: Sub-assembly XP1-1031
5 parts
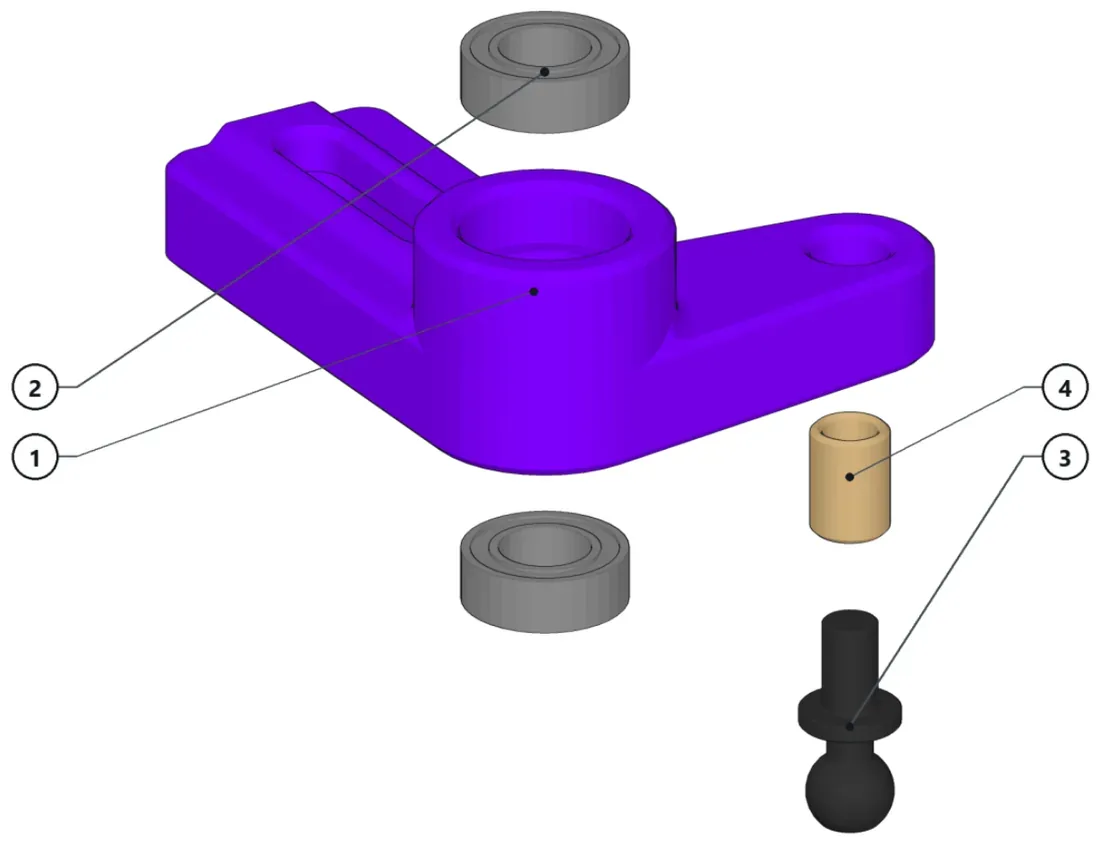
- Install the threaded insert.
- Install the bearings.
Parts · numbers match the drawing
XP1-009×1Steering Lever ArmBB-SX9X4×2BallJoint_4.8mm×14.8mm BallJoint (6mm thread)TI-6×1Brass Threaded Insert (M3x6x4,5)
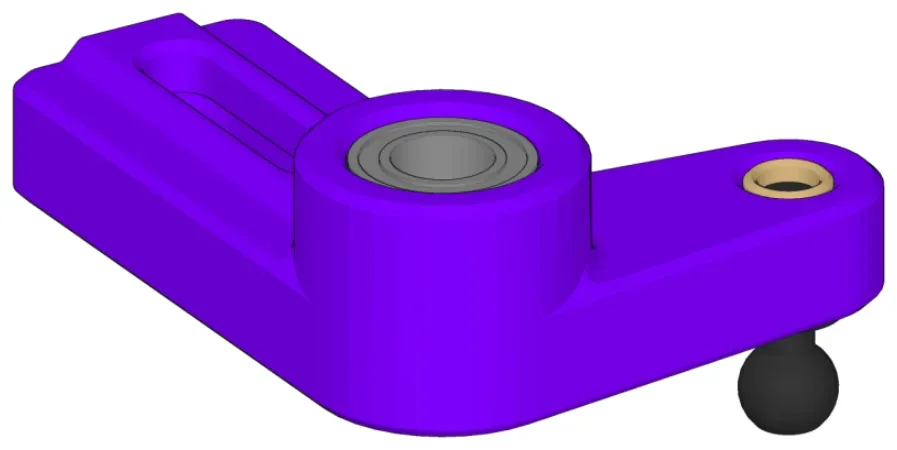
Assembled -
Step 20: Sub-assembly XP1-105
16 parts
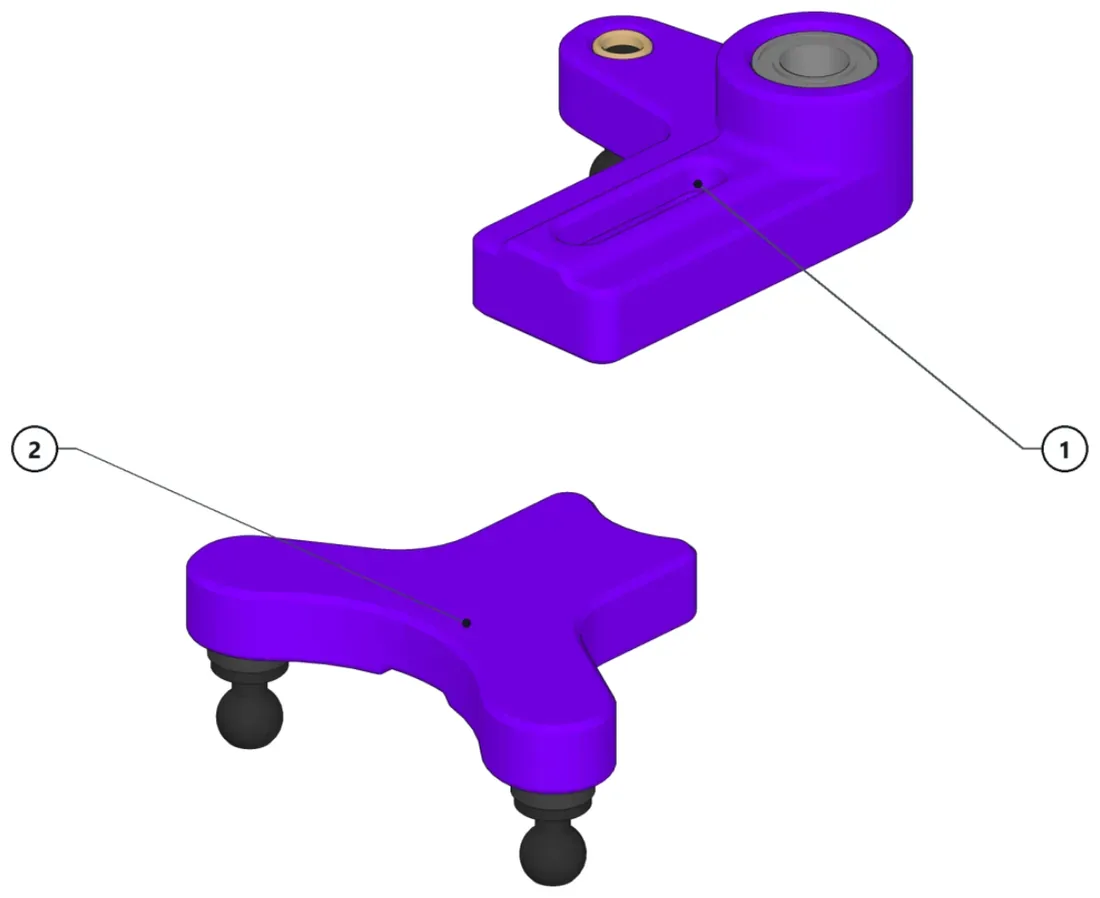
- Screw the two parts together with the two screws.
Parts · numbers match the drawing
XP1-1031×1XP1-1030×1
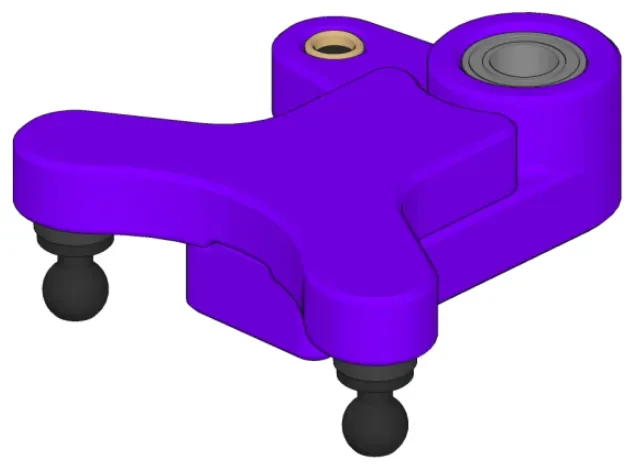
Assembled -
Step 21: Sub-assembly XP1-1003
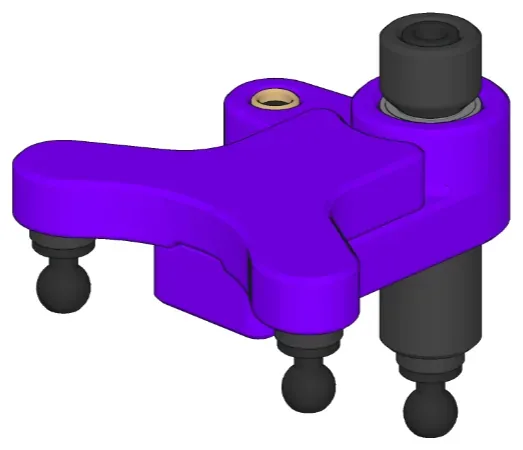
21 parts
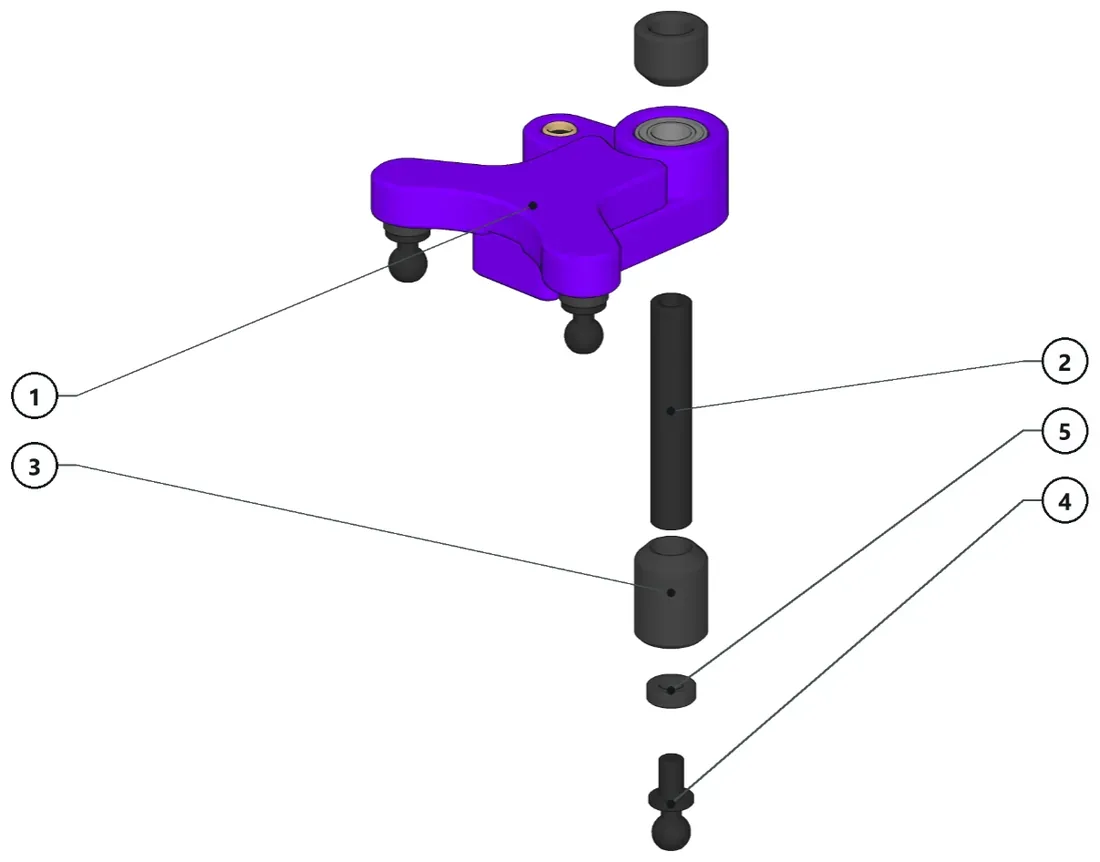
- Assemble the steering pivot point with the round nut, ballstud and the spacers.
Parts · numbers match the drawing
XP1-105×1FR-35×1XP1-012×2Steering Lower SpacerBallJoint_4.8mm×14.8mm BallJoint (6mm thread)SPCR_2MM×12mm Spacer
Assembled -
Step 22: Sub-assembly XP1-1004
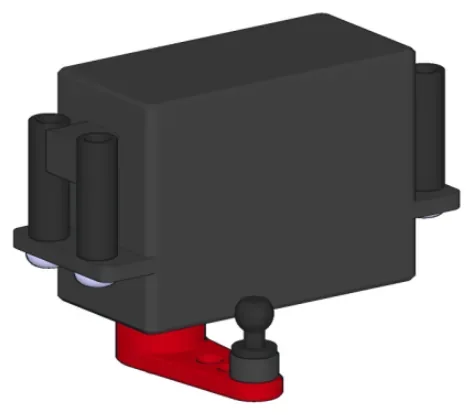
13 parts
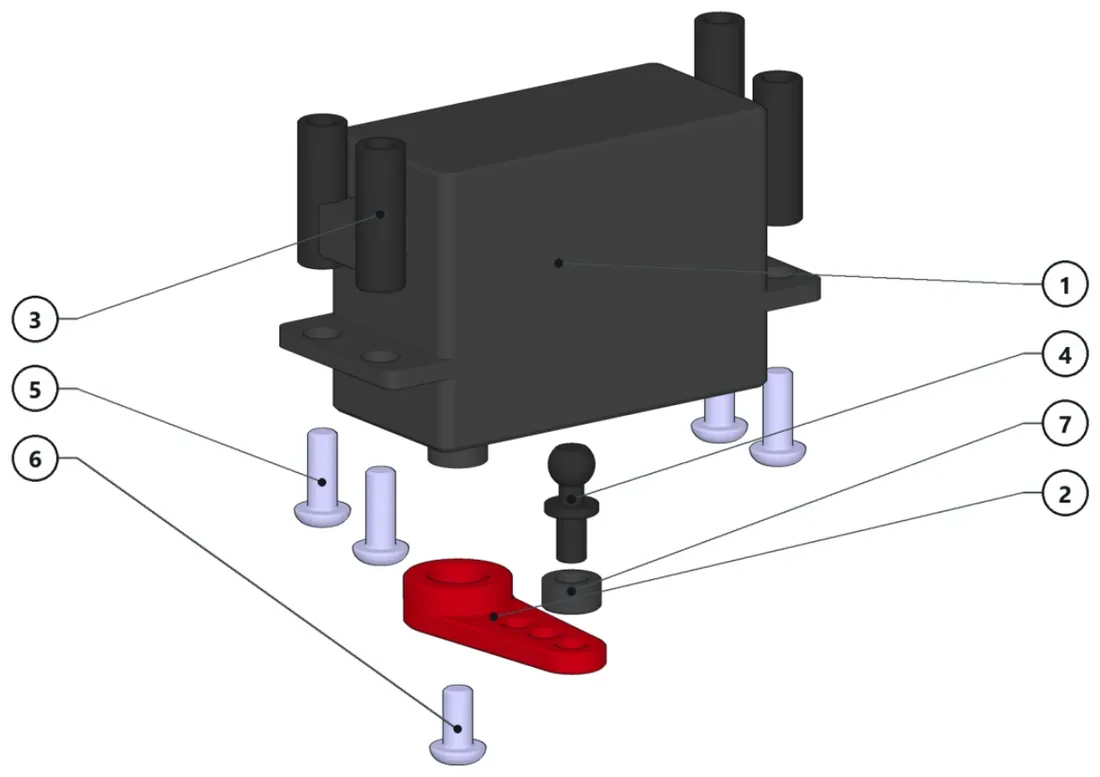
- Screw the four round nuts to the servo with the screws.
- Install the servo horn and the ballstud with the spacer.
Parts · numbers match the drawing
Servo×1Low Profile type ServoBrace_Servo×1FR-15×4BallJoint_4.8mm×14.8mm BallJoint (6mm thread)ISO7380 M3x8×4ButtonHead M3x8 screwM3x6×1SPCR-3MM×13mm Spacer
Assembled -
Step 23: Sub-assembly XP1-1005
3 parts
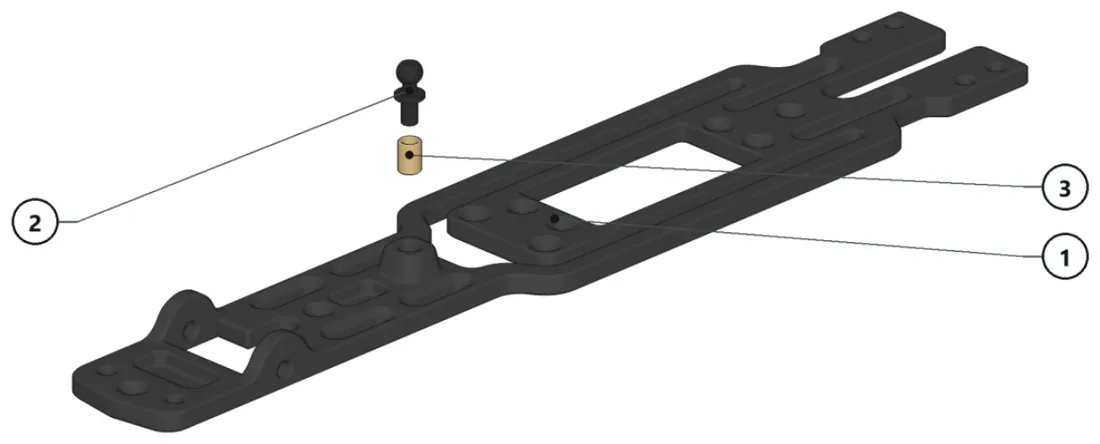
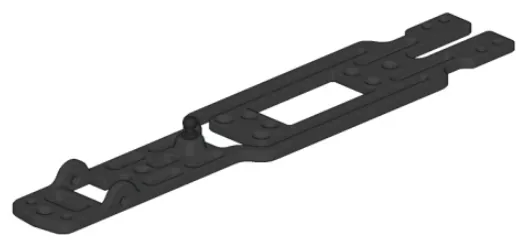
- Install the threaded insert and the ballstud to the upper deck.
Parts · numbers match the drawing
XP1-004×1Upper DeckBallJoint_4.8mm×14.8mm BallJoint (6mm thread)TI-6×1Brass Threaded Insert (M3x6x4,5)
Assembled -
Step 24: Sub-assembly XP1-1006
9 parts
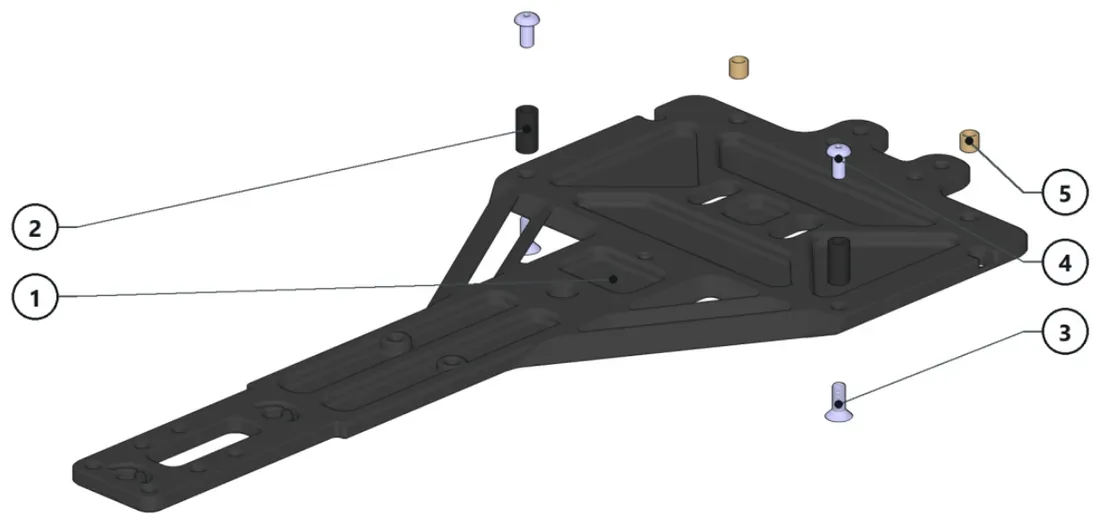
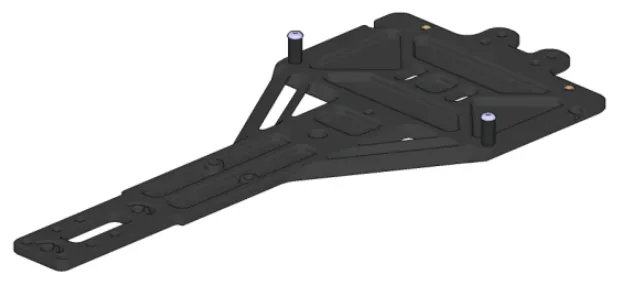
- Install the threaded inserts to the bottom deck.
- Install the battery guards’ pivot points to the bottom deck with the screws.
Parts · numbers match the drawing
XP1-001×1Lower DeckFR-10×2Screw_ISO_10642_M3x8_A2×2M3x6×2TI-4×2Brass Threaded Insert (M3x4x4,5)
Assembled -
Step 25: Sub-assembly XP1-102
89 parts
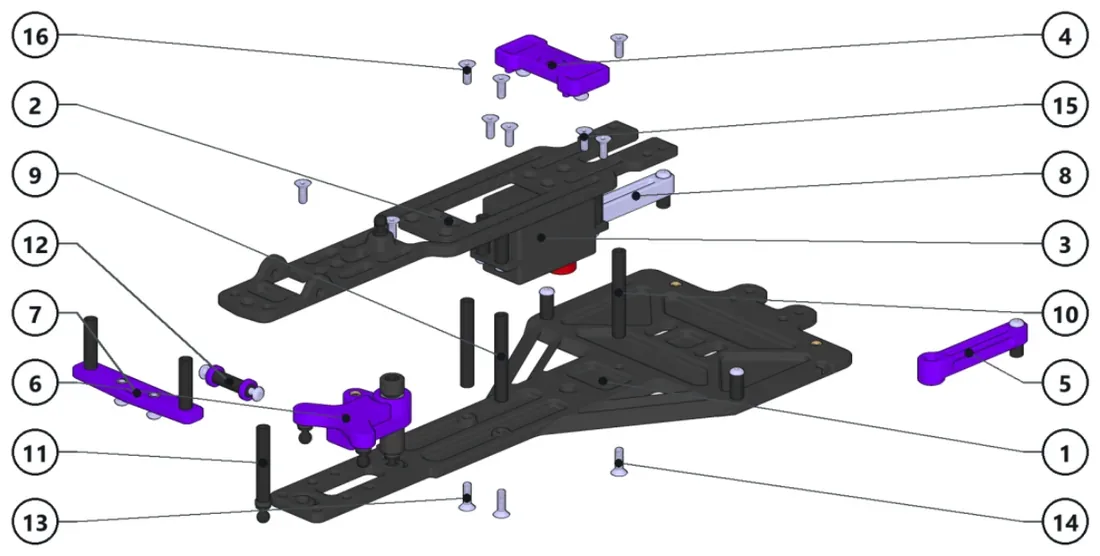
- Assemble the main chassis as shown.
- Before installing the XP1-1001 assembly, install the front bellcrank (XP1-104) to the round nut.
- A slight fit adjustment between the bearings and the round nut may be needed.
Parts · numbers match the drawing
XP1-1006×1XP1-1005×1XP1-1004×1XP1-116×1XP1-111-2×1XP1-1003×1XP1-1000×1XP1-111-1×1RN-35×2Round Nut M3 (35mm)FR-35×1XP1-1002×1XP1-1001×11S010642 M3x10×2CounterSunk ISO10642 M3x1.Screw_ISO_10642_M3x10_A2×1Screw_ISO_10642_M3x8_A2×71S010642 M3x8×2CounterSunk ISO10642 M3x8 S…
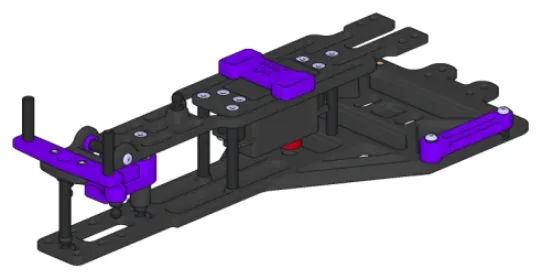
Assembled -
Step 26: Sub-assembly XP1-112
24 parts
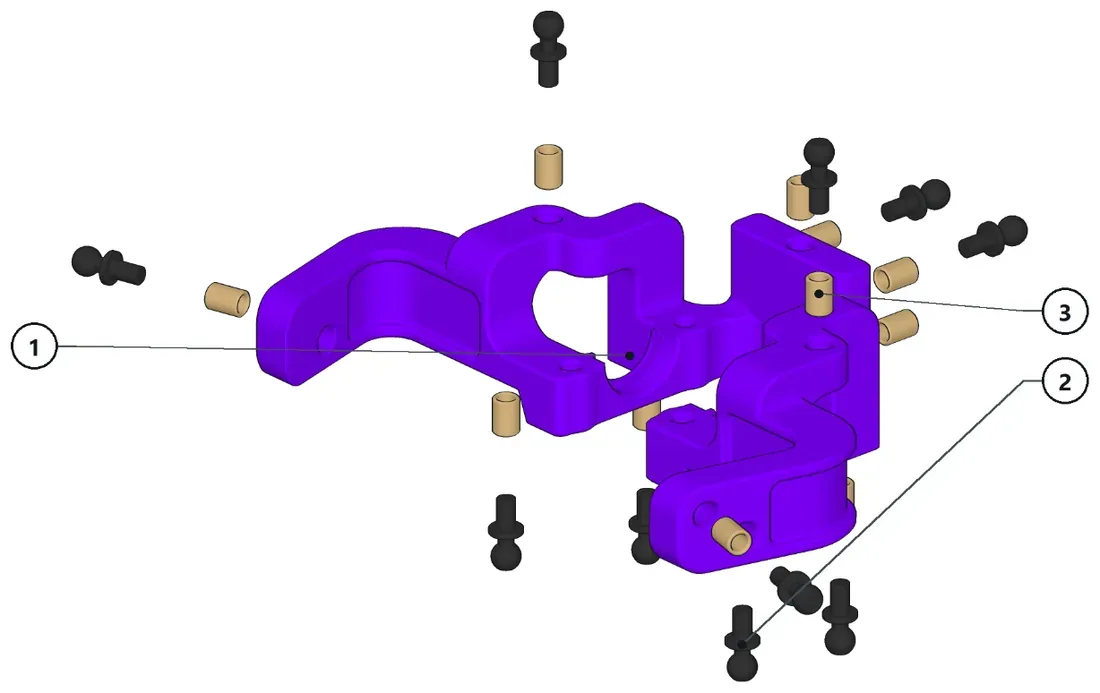
- Install all threaded inserts and ballstuds.
Parts · numbers match the drawing
XxP1-032×1Rear SubframeBallJoint_4.8mm×104.8mm BallJoint (6mm thread)TI-6×13Brass Threaded Insert (M3x6x4,5)
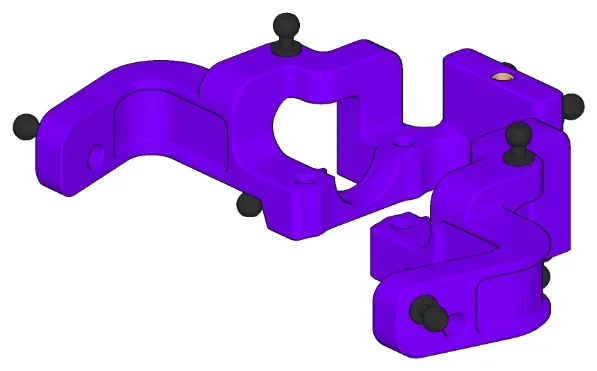
Assembled -
Step 27: Sub-assembly XP1-115
16 parts
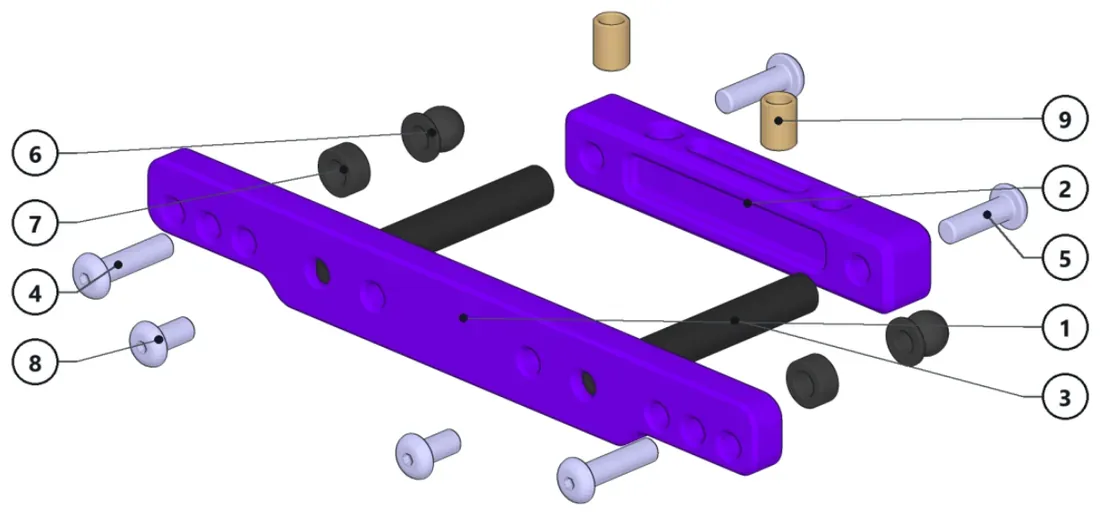
- Assemble the rear suspension and body mount.
- Install the threaded inserts to XP1-037 first.
Parts · numbers match the drawing
XP1-035×1Rear Suspension SupportXP1-037×1Rear Magnet SupportFR-35×2M3x12×2M3x10×2Ball_Femella_5,5mm_V2×2SPCR-3MM×23mm SpacerM3x6×2TI-6×2Brass Threaded Insert (M3x6x4,5)
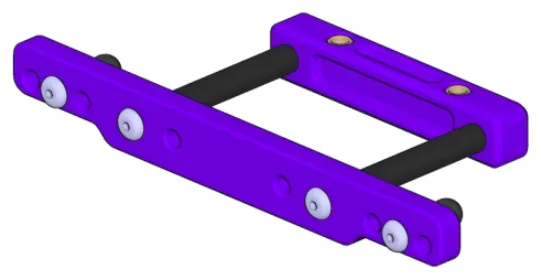
Assembled -
Step 28: Sub-assembly XP1-107-1
14 parts
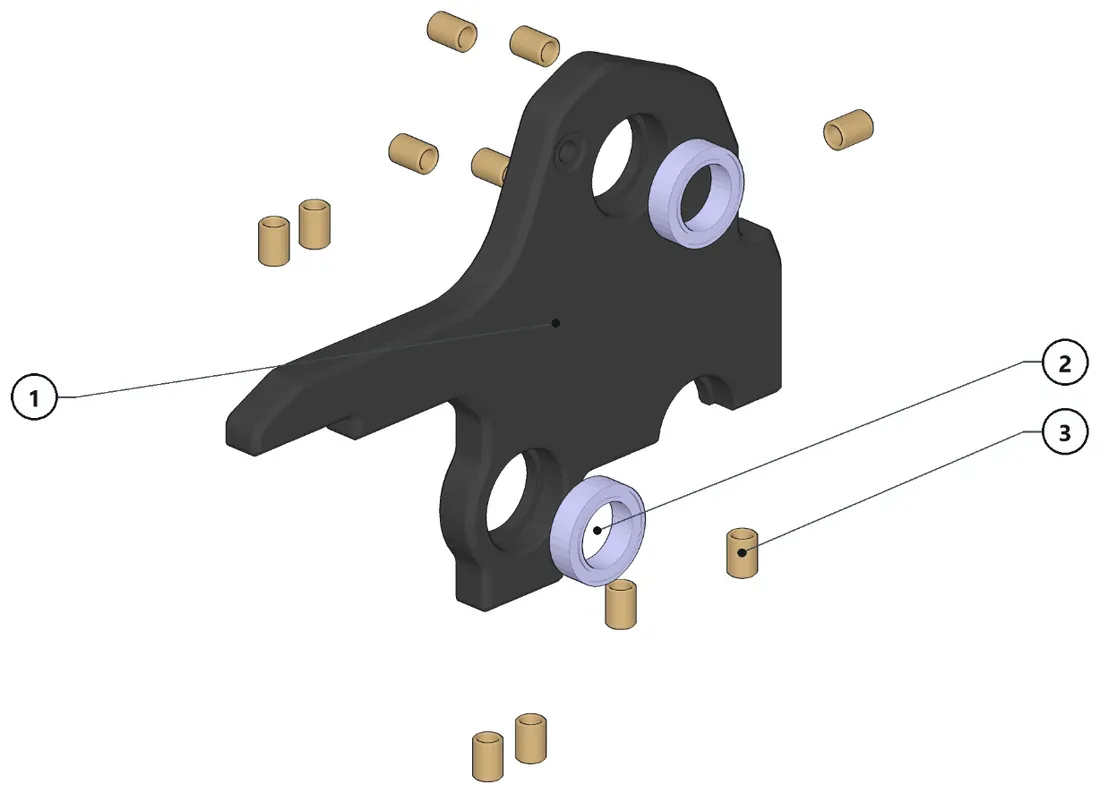
- Install all threaded inserts and bearings.
Parts · numbers match the drawing
XP1-016-1×1Rear Bulk-head RightBB-10X15X5×2TI-6×11Brass Threaded Insert (M3x6x4,5)
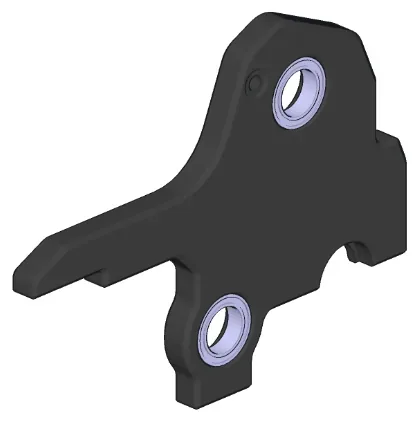
Assembled -
Step 29: Sub-assembly XP1-107-2
14 parts
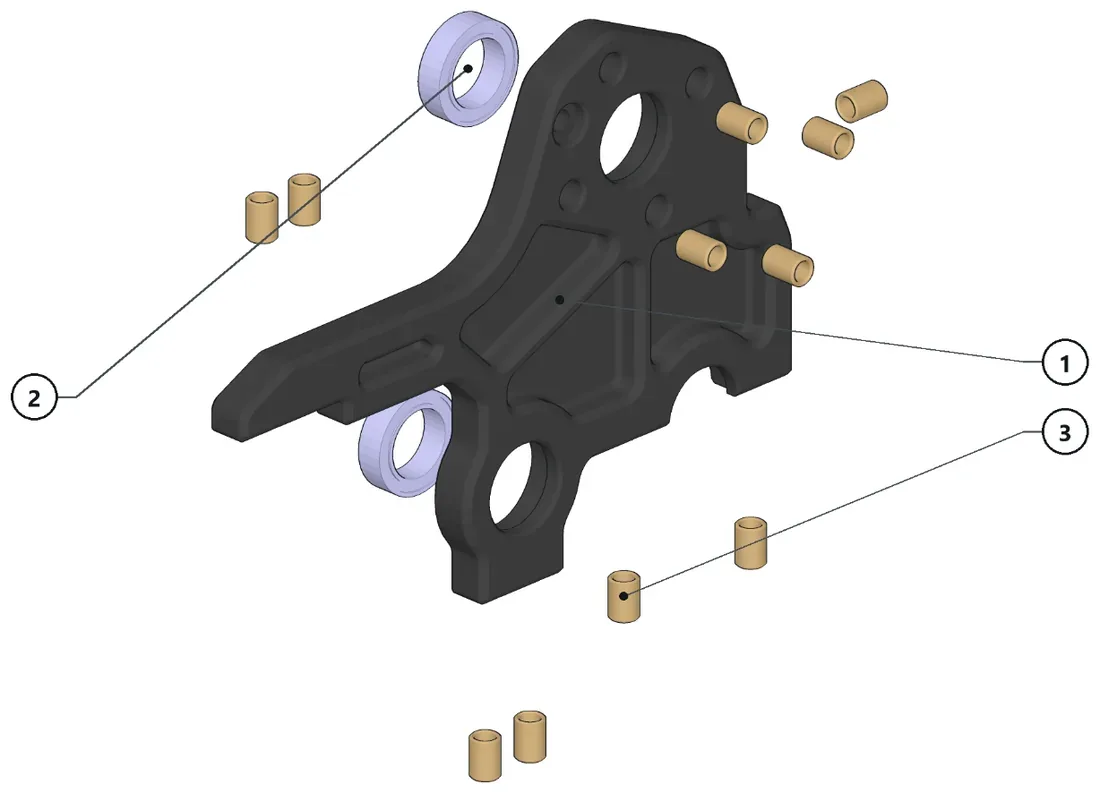
- Install all threaded inserts and bearings.
Parts · numbers match the drawing
XP1-016-2×1Rear Bulk-head LeftBB-10X15X5×2TI-6×11Brass Threaded Insert (M3x6x4,5)
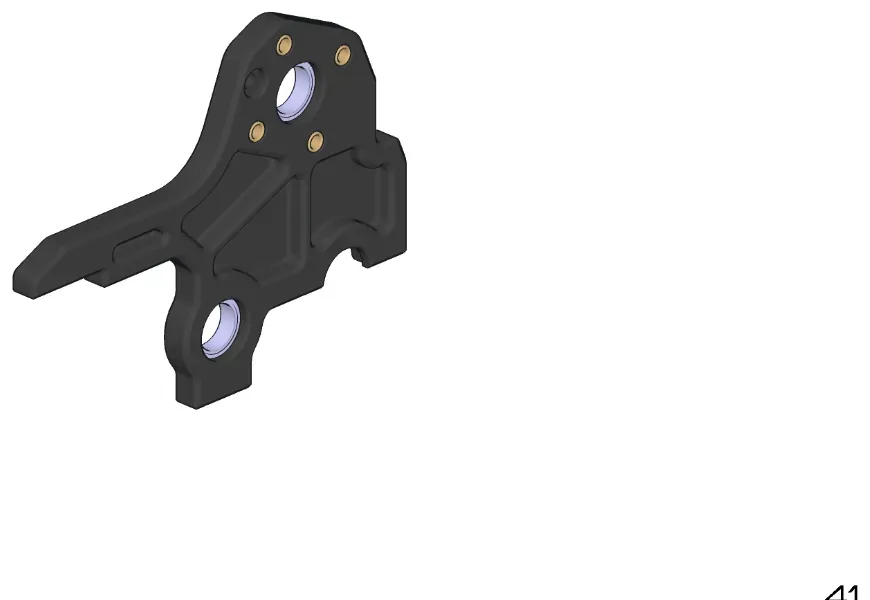
Assembled -
Step 30: Sub-assembly XP1-109
4 parts
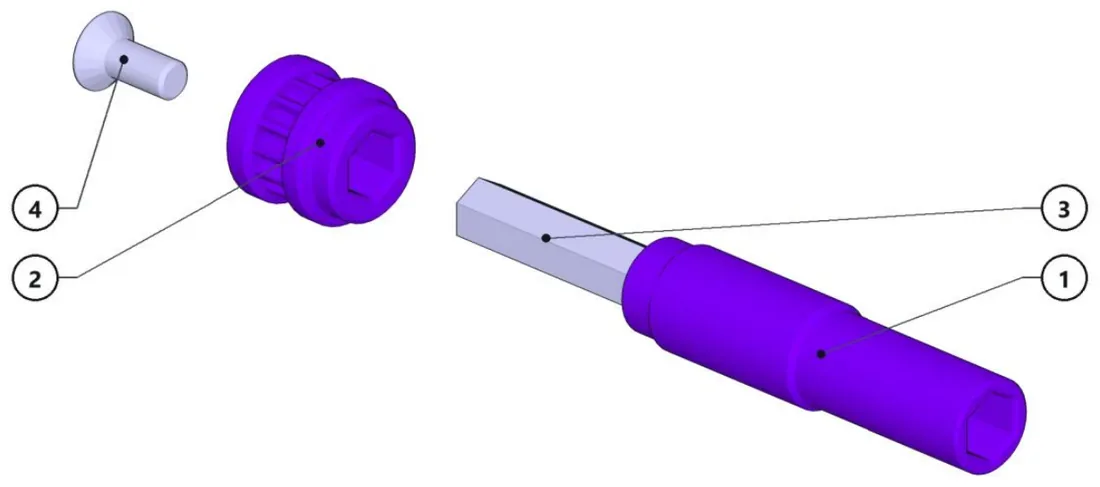
- Assemble this part during step 35.
Parts · numbers match the drawing
XP1-022×1Main Shaft CoverXP1-021×114T Belt PulleyLHN-65×1ISO10642 M4x10×1ISO10642 M4x10 Countersun…
-
Step 31: Sub-assembly XP1-110
6 parts
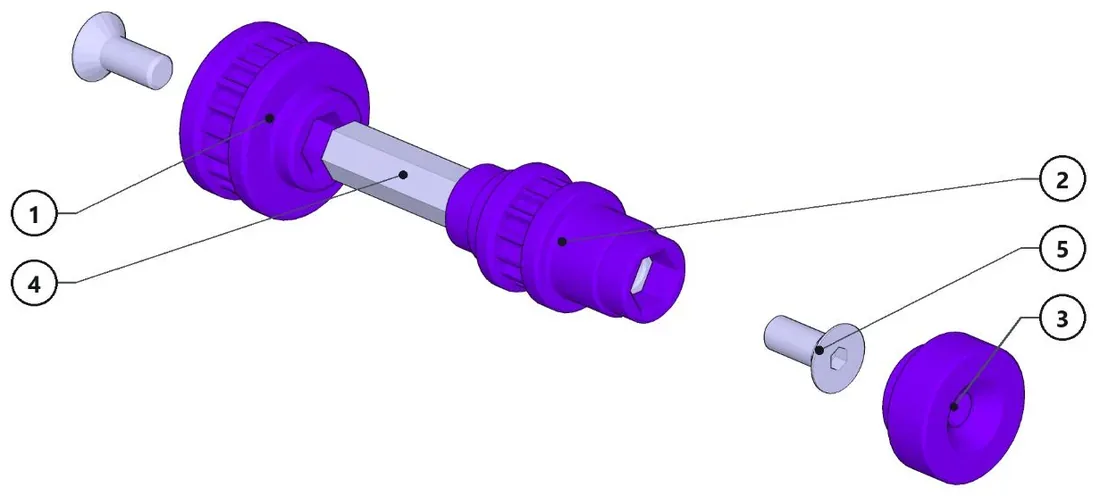
- Assemble this part during step 35.
Parts · numbers match the drawing
XP1-025×120T Belt PulleyXP1-028×114T Belt PulleyXP1-026×1Secondary Shaft End CapFH-30×1ISO10642 M4x10×2ISO10642 M4x10 Countersun…
-
Step 32: Sub-assembly XP1-1011
7 parts
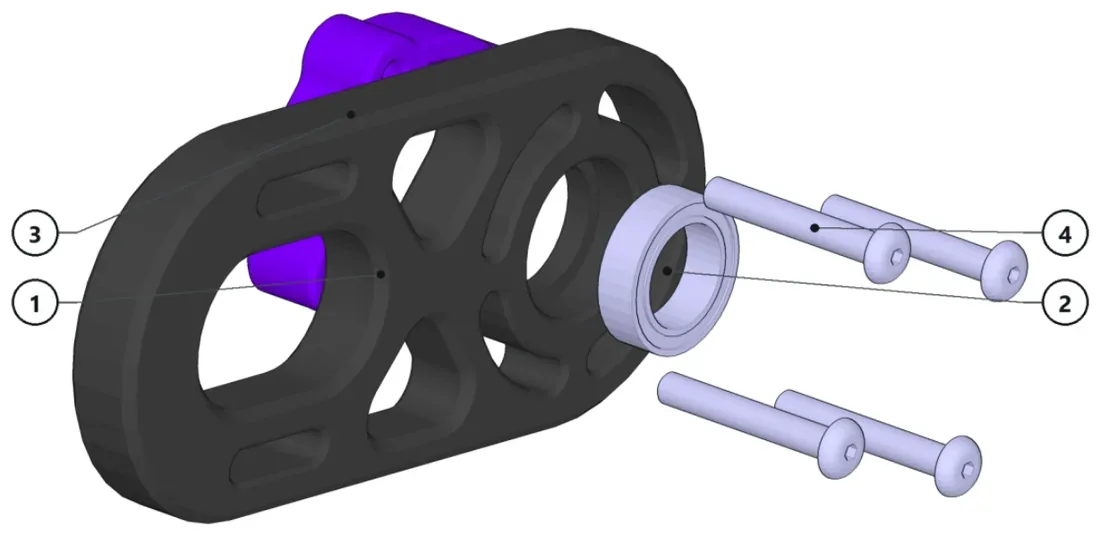
- Assemble this part during step 35.
Parts · numbers match the drawing
XP1-018×1Adjustable Motor SupportBB-10X15X5×1XP1-017×1Motor Support SpacerM3x20×4
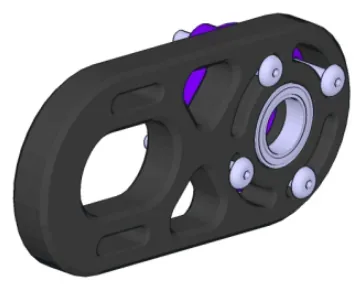
Assembled -
Step 33: Sub-assembly XP1-1013
2 parts
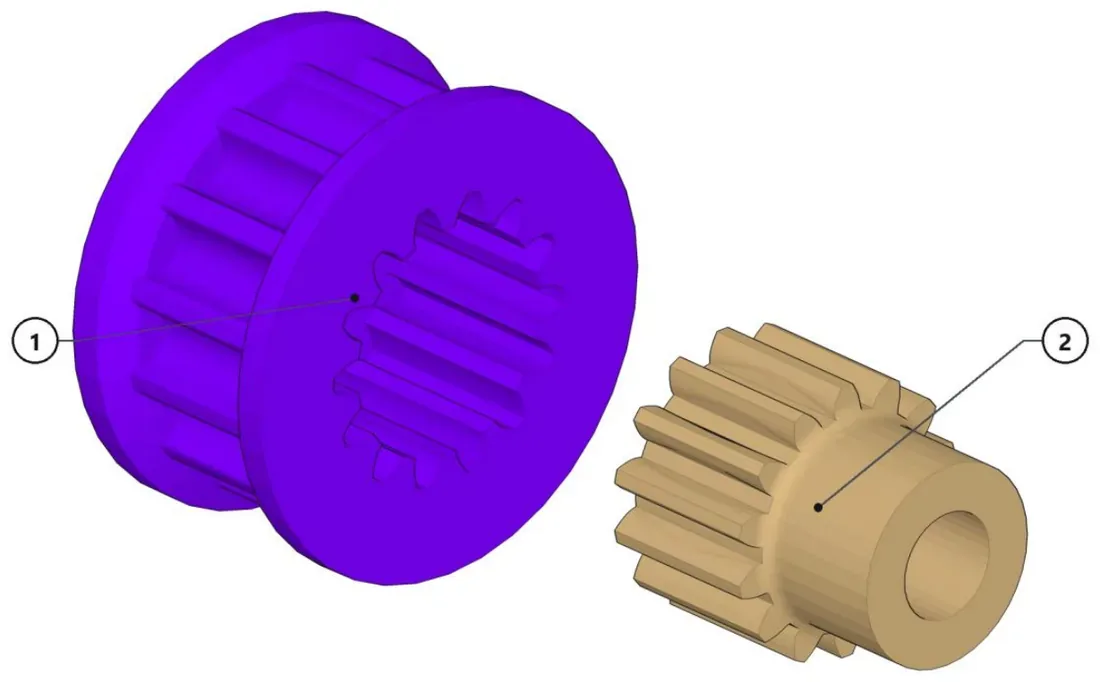
- Press fit the pinion to the pulley.
Parts · numbers match the drawing
Pinyo 14T×114T_PINION×1Standard 14T 48p pinion
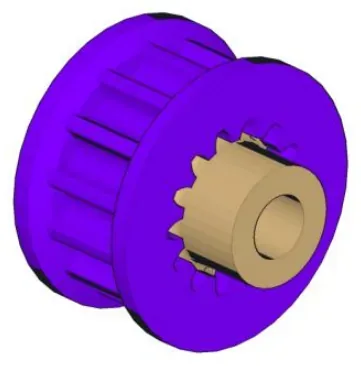
Assembled -
Step 34: Sub-assembly XP1-1012
4 parts
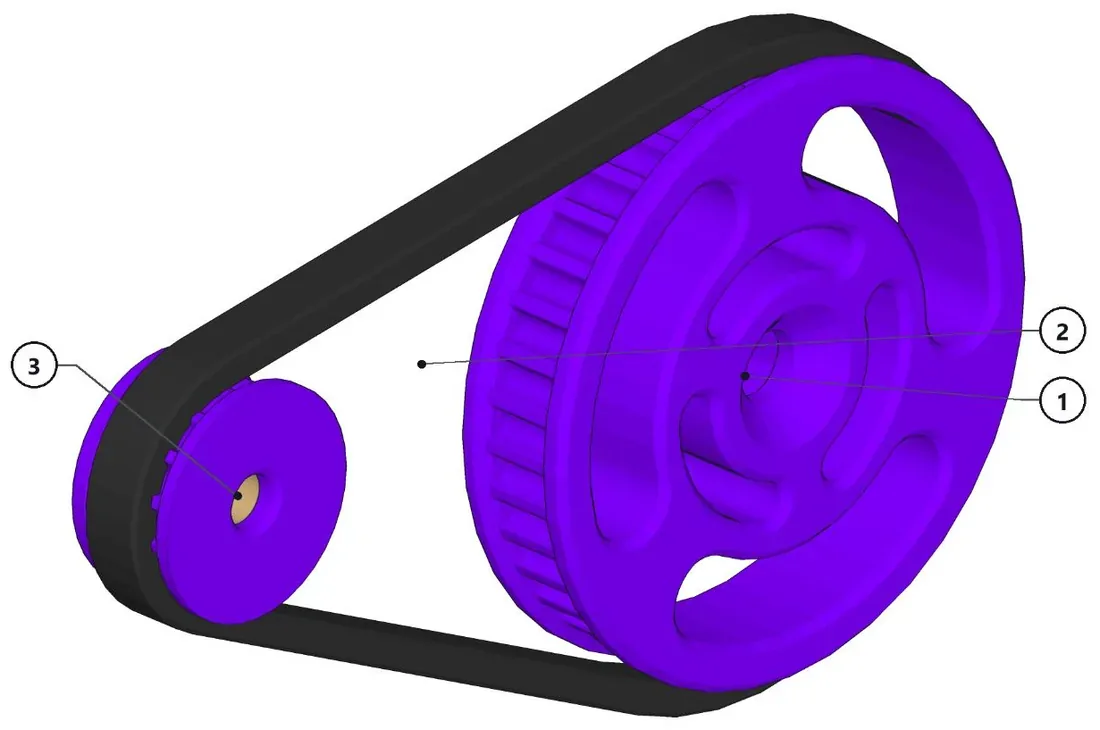
- Assemble this part during step 35.
Parts · numbers match the drawing
XP1-023×138T Belt Pulley First StageHTD3MBELT_54T×1XP1-1013×1
-
Step 35: Sub-assembly XP1-1010
52 parts
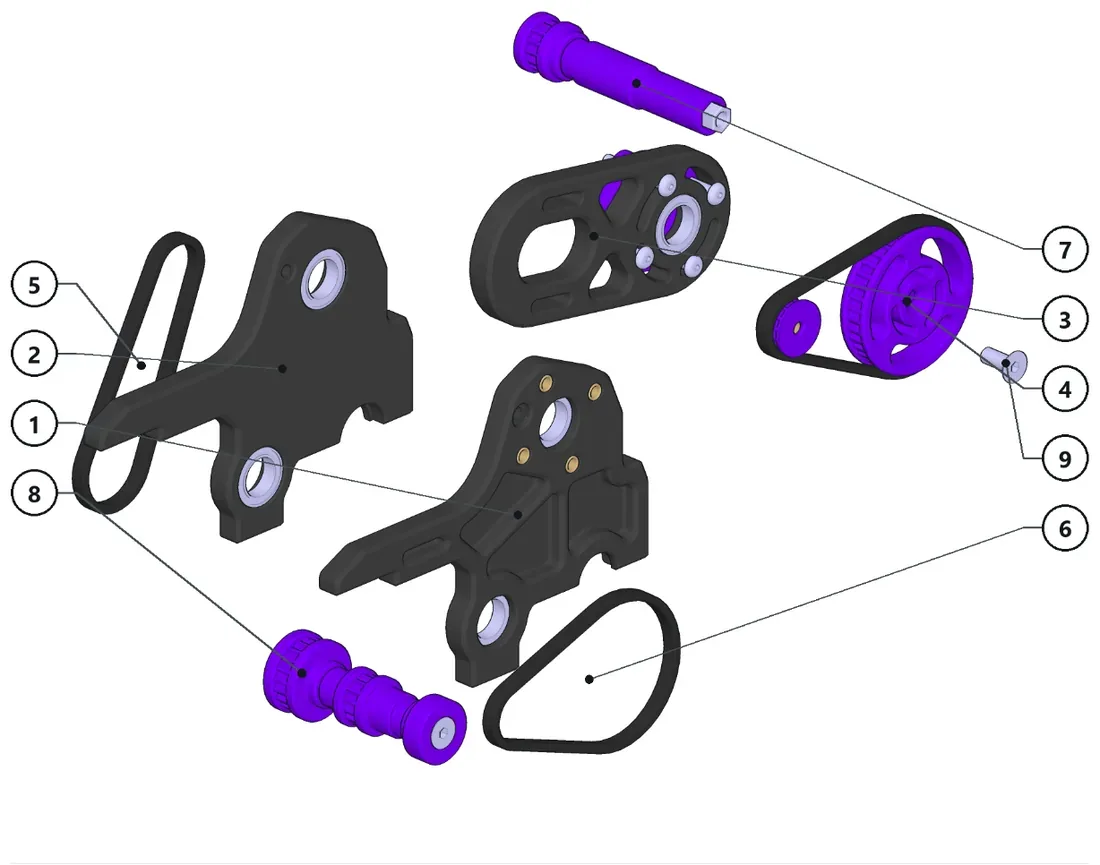
- It is important to remember to install the XP1-110 assembly with the belt!
Parts · numbers match the drawing
XP1-107-2×1XP1-107-1×1XP1-1011×1XP1-1012×1HTD3MBELT_SOT×1HTD3MBELT_SOT (diff)×1SOT HTD3M belt (3 or 4…XP1-109×1XP1-110×1ISO10642 M4x10×1ISO10642 M4x10 Countersun…
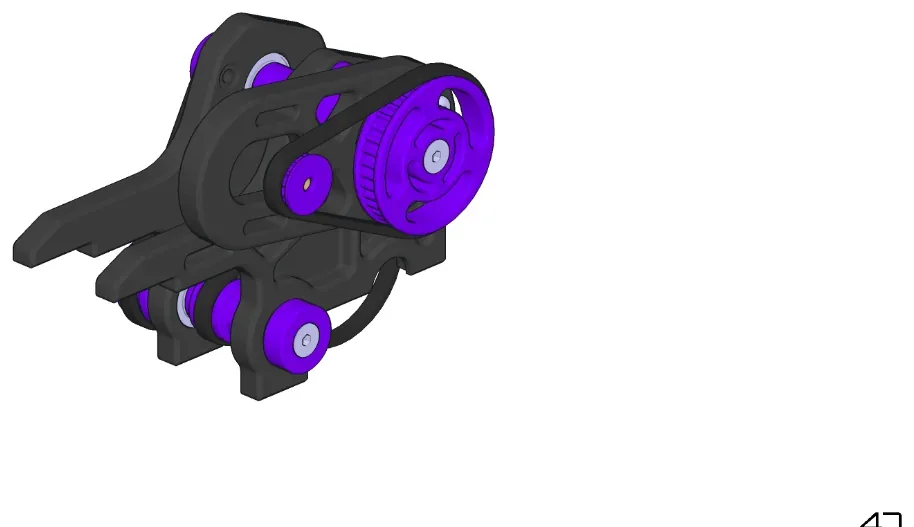
Assembled -
Step 36: Sub-assembly XP1-1014
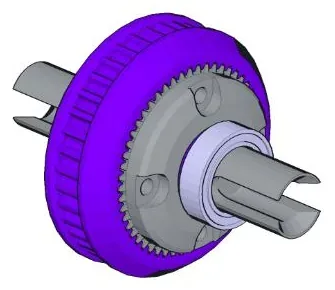
6 parts
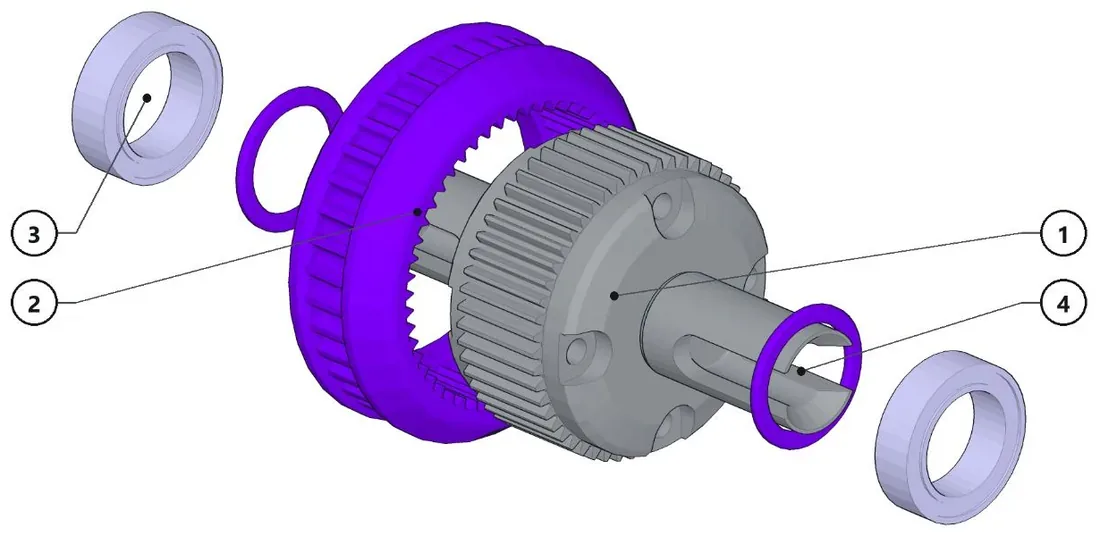
- Press fit the "38T-Rhino" part to the diff. This works also for yokomo diff.
- Otherwise, you can use the RDX Spool with "XP2-1429-RDX" part.
Parts · numbers match the drawing
Rhino_Diff×138T-Rhino×1BB-10X15X5×2XP1-020×2Diff Spacers
Assembled -
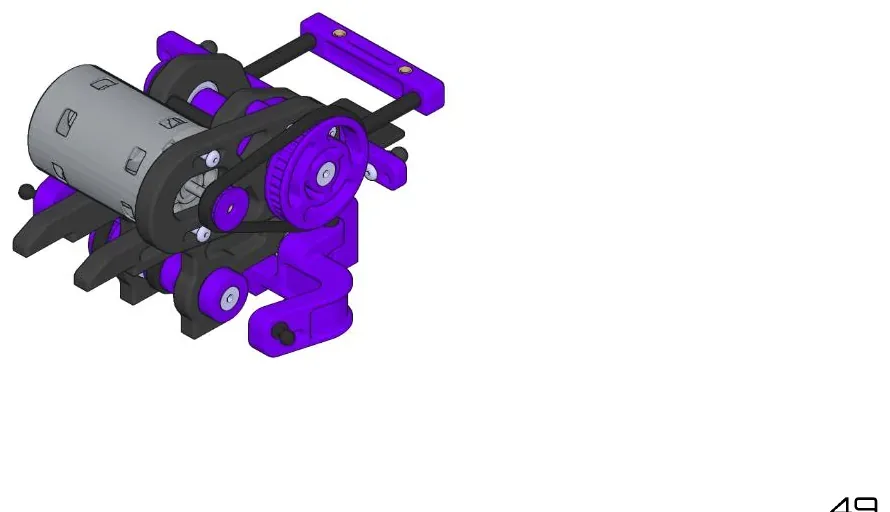
Step 37: Sub-assembly XP1-108
112 parts
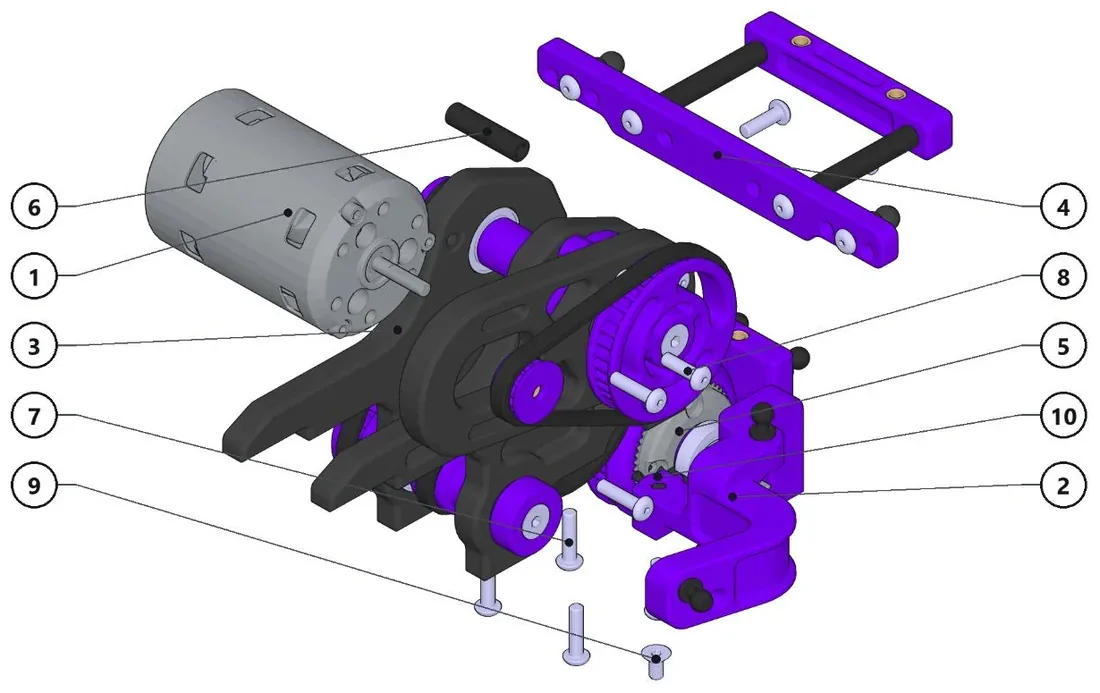
- Wrap the lower belt around the diff and fit the diff to the sub-frame (XP1-112).
- Bolt the sub frame to the transmission assembly.
- Bolt the rear suspension support and body mount to the transmission assembly.
- Install the reinforcement round nut with the two screws.
- Optionally install the motor now.
Parts · numbers match the drawing
540. MOTOR×1Standard 540 Size MotorXP1-112×1a XP1-1010×1XP1-115×1XP1-1014×1RN-20×1Round Nut M3 (20mm)M3x12×6M3x10×4ISO10642 M3x6×1CounterSunk ISO10642 M3x6XP1-043×1
Assembled -
Step 38: Sub-assembly XP1-1020
209 parts
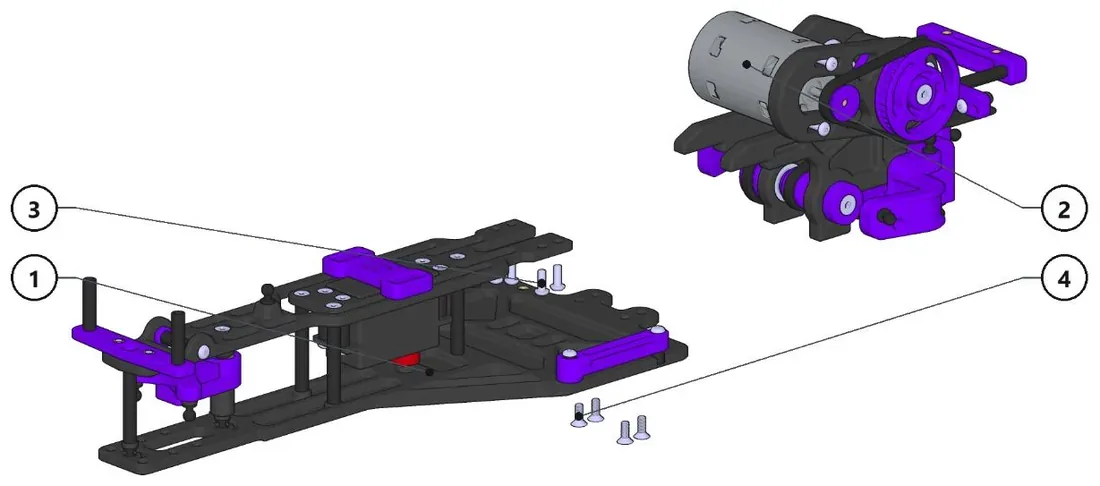
- Assemble the transmission structure to the main chassis with the eight screws from the bottom.
Parts · numbers match the drawing
XP1-102×1XP1-108×1ISO7380 M3x8×4ButtonHead M3x8 screwScrew_ISO_10642_M3x8_A2×4
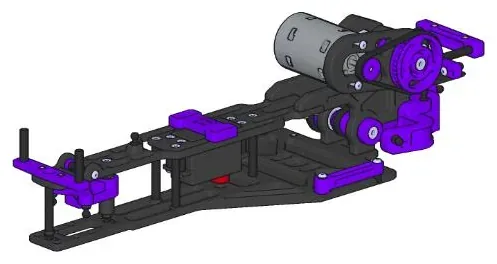
Assembled -
Step 39: 55 mm shock absorbers
2 parts — make 3 times
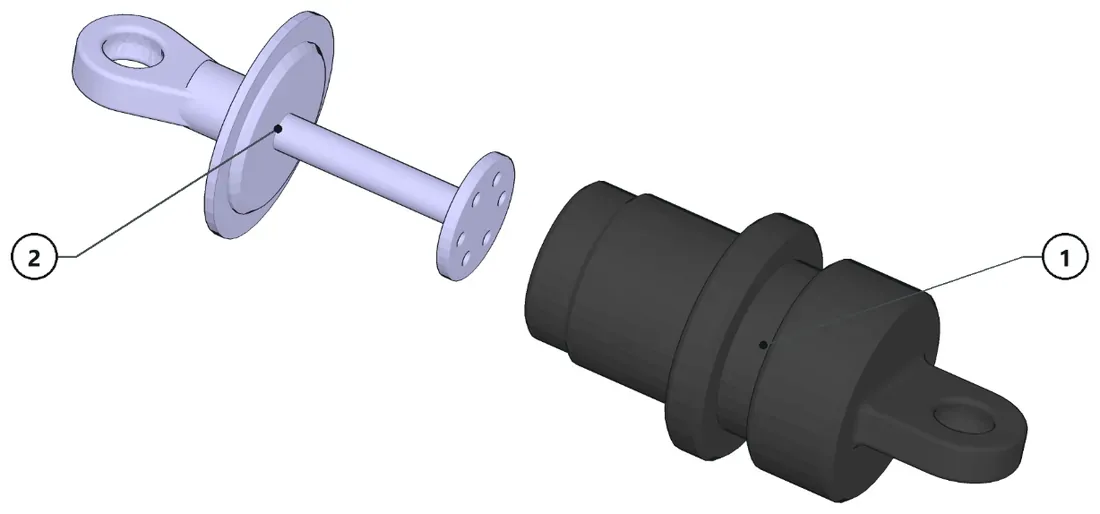
- Build your shock absorbers.
Parts · numbers match the drawing
Shock_Top×1Shock Absorber (Top Part)Shock_Bottom×1Shock Absorbers (Bottom Part)
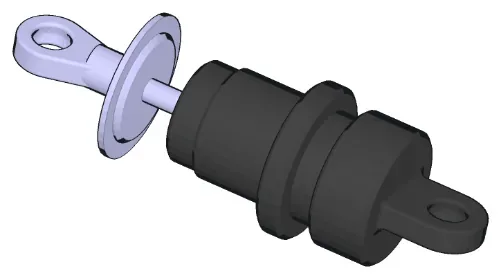
Assembled -
Step 40: Yokomo rear axles (Y2-010)
2 parts — make 2 times
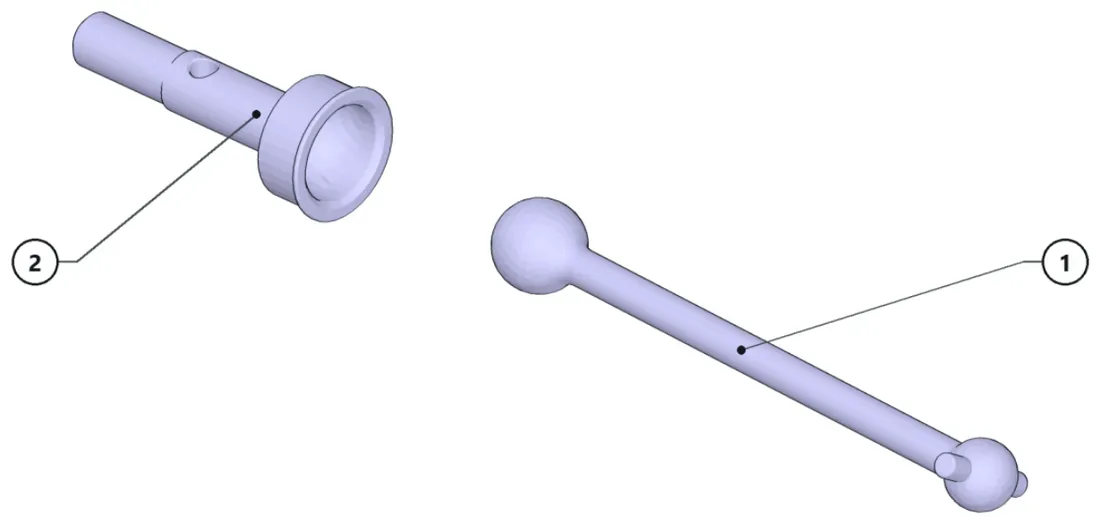
- Assemble the rear axles.
Parts · numbers match the drawing
YOKOMO_47MMAXLE×1Yokomo Rear Axle (Yoko.YOKOMO_REARAXLE×1
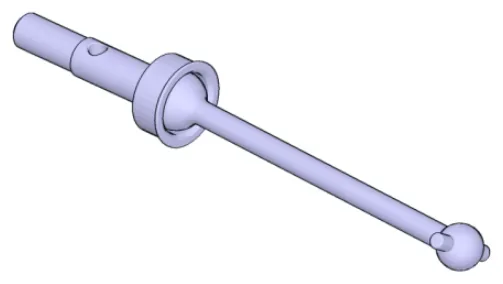
Assembled -
Step 41: Final assembly
All sub-assemblies and loose hardware in place
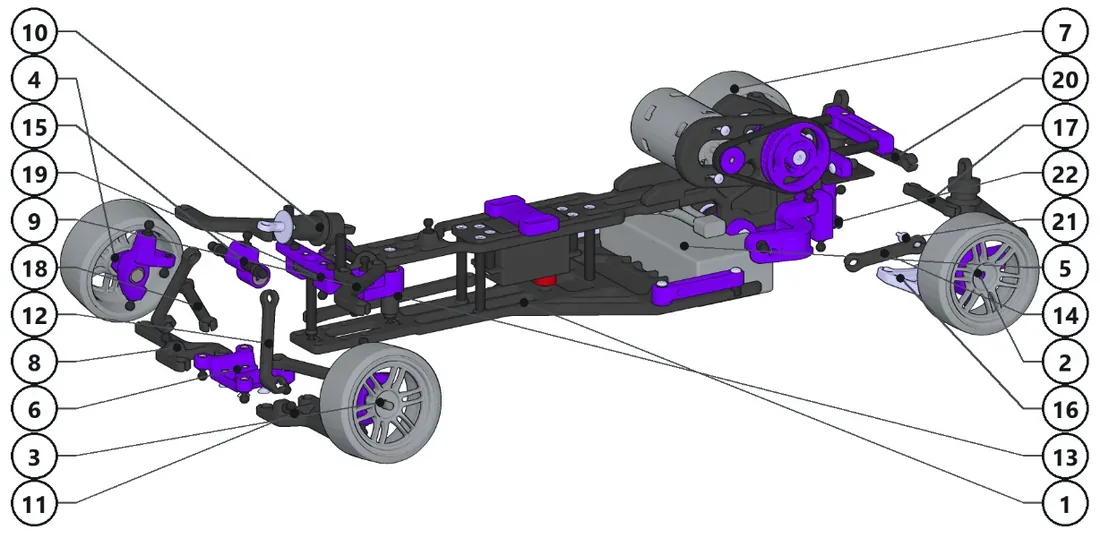
- Assemble all the sub-assemblies.
- Install the rear axles.
- Pop in all the suspension and steering arms.
- Done!
Parts · numbers match the drawing
XP1-1020×1XP1-113-2×1XP1-106-2×1XP1-106-1×1Battery×1"Shorty" type batteryXP1-002×1Front SubframeXP1-113-1×1XP1-101×1XP1-006×2Front UCA Right and Left55mm ShockAbsorber×3XP1-101-2×1XP1-008×2Front Fixed-lenght Push-rodXP1-011×1Servo Fixed-lenght ActuatorXP1-039×2Rear Traction Fixed-length ArmXP1-104×1XP1-114-2×1XP1-040×2Rear Camber Fixed-length ArmXP1-015×2Fixed-length Steering RodsXP1-103×1XP1-038×2Rear Active Toe Fixed-length ArmYOKOMO_47MMAXLE×2Yokomo Rear Axle (Yoko…XP1-114-1×1
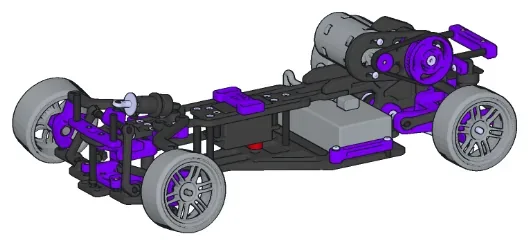
Assembled
Manual history
| V1.5.1 | Added assembly instructions. |
|---|---|
| V1.5 | Compatibility with the RDX spool. |
| V1.4 | Re-designed balljoints. |
| V1.3 | ESC support and modifications to suit optional parts. |
| V1.2 | Steering update, wheelbase fix and belt tension fix. |
| V1.1 | Flexing system update. |
| V1.0 | First release. |
Previous manuals (5)
- Manual V1.4 PDF, 1.2 MB
- Manual V1.3 PDF, 1.3 MB
- Manual V1.2 PDF, 1.4 MB
- Manual V1.1 PDF, 1.3 MB
- Manual V1.0 PDF, 1.2 MB